
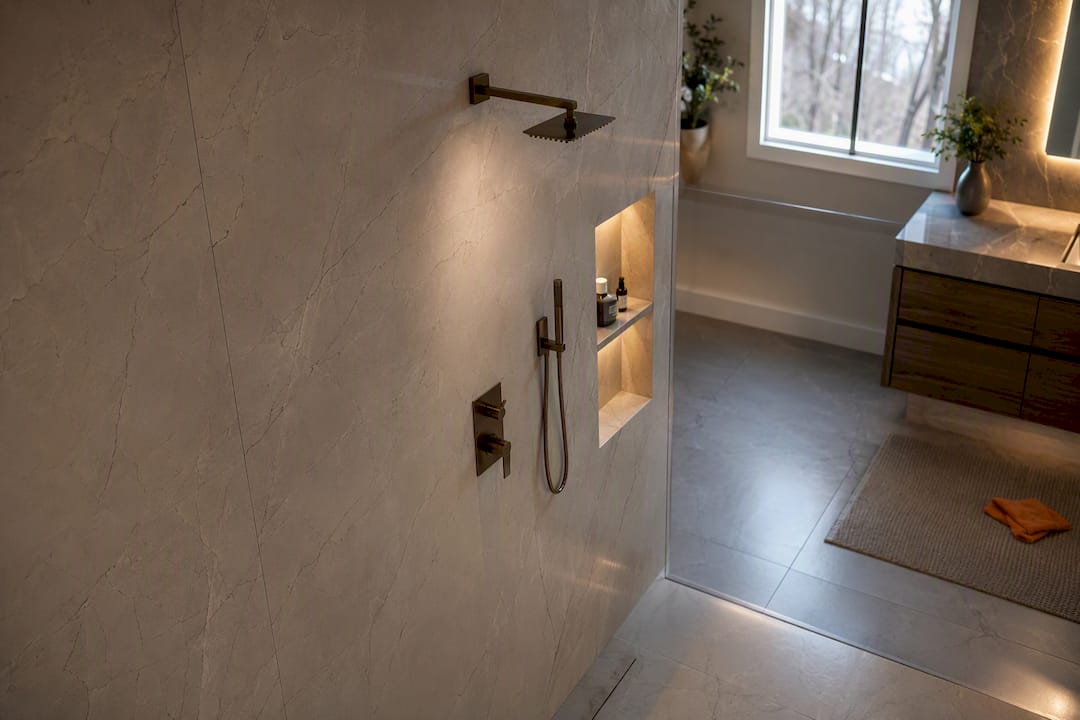
Yes, large-format tile is one of the strongest choices for a bathroom remodel, but only if the installer respects the substrate and mortar rules that keep it flat. Fewer grout lines give walls and floors a clean, expansive look that small tile can’t match. The real risk isn’t the tile, but what happens underneath it before a single piece gets set.
TL;DR:
- Large-format tile installation requires a flat substrate with a maximum 1/8 inch deviation over 10 feet to prevent cracking and lippage.
- Skilled labor with experience in leveling systems and appropriate mortar, such as medium-bed mortar, is essential for successful large panels.
- Proper waterproofing and movement joints are critical to avoid future cracks, especially at transitions and corners.
- Large format tiles are most effective on shower and wall surfaces, with floors needing textured finishes and careful slope management for safety.
- Opting for slabs or rectified tiles enhances the seamless, slab-like appearance but increases installation complexity and cost.
Table of Contents
- What Counts as Large Format Tile for a Bathroom?
- How Does Large Format Tile Change a Bathroom’s Look?
- Large Format Tile: Pros and Cons for Bathroom Owners
- What Installation Standards Actually Prevent Failures?
- Where Should You Actually Use Large Format Tile?
- What Does a Large Format Tile Bathroom Actually Cost?
- How Do You Choose the Right Size, Finish, and Grout?
- How Does a Design-Build Remodeler Lower the Risk?
- Our Take on the Large Format Tile Debate
- Ready to Start Your Large Format Tile Project?
- Sources
What Counts as Large Format Tile for a Bathroom?
There’s no single legal definition, but the trade generally agrees on a threshold: any tile with one edge measuring 15 inches or longer qualifies as large format. Some retailers set the bar lower, at 12 inches, which is why you’ll see the term applied loosely across product lines. Either way, once you’re past standard 12×12 tile, you’re in large format territory, and the installation rules change with it.
For a bathroom specifically, homeowners typically choose from a narrow band of sizes:
- 12×24 inches, the entry point for large format and the easiest to handle on both floors and walls
- 24×24 inches, a square format that reads more like stone flooring than ceramic tile
- 24×48 inches, the size most associated with the “slab look” on shower walls
- Slab panels, porcelain sheets running up to 32×94 inches, used for a single continuous wall or tub surround
Size isn’t the only variable that changes your grout lines. Rectified tile, cut to exact dimensions after firing, allows joints as narrow as 1/16 inch. Non-rectified tile has rounded, slightly irregular edges and needs wider grout lines, often 3/16 inch or more, to hide the variation. If you want that seamless, slab-like effect, rectified is almost always the better call.
How Does Large Format Tile Change a Bathroom’s Look?
The main appeal is simple: fewer grout lines mean the eye reads the surface as one continuous plane instead of a checkerboard. That single change is why large-format tile creates a slab-like look that makes small and midsize bathrooms feel noticeably more open.
Shower walls are where this pays off the most. A 24×48 panel run floor-to-ceiling on the main shower wall eliminates dozens of grout lines a 4×4 subway pattern would require, and it does it without hiding any of the tile’s pattern or veining.
Marble-look porcelain slabs take this further. Because the panels are large, installers can vein-match adjacent pieces so the pattern flows across a corner or around a niche the way real stone would, rather than restarting at every seam. That continuity is part of why designers increasingly pair large wall tiles with smaller floor tiles for traction, keeping the visual drama up top while solving grip underfoot with a different material scale.
A few layout choices make or break the effect:
- Run the longest tile dimension vertically on shower walls to draw the eye up and make ceilings feel higher.
- Order full slabs, not just samples, when vein-matching matters. Dye lots and pattern repeats can shift between batches.
- Use a mosaic accent in the niche or shower pan for texture, then let the surrounding field stay large and quiet.
- Avoid mixing more than two tile scales in one shower. Three or more competing sizes undercuts the openness you’re trying to create.
Pro Tip: If you’re set on vein-matching, ask your tile supplier to pull consecutive slabs from the same production run before installation day. Matching after the fact, once tiles from different lots are on site, rarely works.
Large Format Tile: Pros and Cons for Bathroom Owners
Large-format tile solves real problems, but it also asks more of your budget and your installer. Weigh both sides before you commit a whole bathroom to it.
What you gain:
- A cleaner, more expensive-looking finish with far less visible grout to collect grime.
- Easier day-to-day cleaning, since fewer joints means fewer places for soap scum and mildew to take hold.
- Porcelain large-format tile is dense and largely non-porous, which holds up well against moisture in a shower environment.
- A slab aesthetic without slab pricing, since porcelain panels cost less than natural stone of comparable size.
What it costs you:
- Skilled labor runs higher than standard tile installs. Large panels are harder to handle, cut, and set without cracking.
- Your substrate has to be flatter than what standard 12×12 tile tolerates, which sometimes means an extra prep step before installers even open a tile box.
- Polished large-format tile on a bathroom floor can create real slip risk, especially once water and soap residue build up.
- Not every remodeler has experience with the mortar and leveling systems large panels require. Hiring the wrong crew is the single biggest cause of failed installs.
Skip large format tile if your subfloor is significantly uneven and you’re not budgeting for self-leveling compound, or if you’re planning a DIY install without prior experience setting anything larger than 12×12. This is one category of tile where enthusiasm alone doesn’t get you a good result.
What Installation Standards Actually Prevent Failures?
Every large-format tile failure traces back to one of a handful of preventable mistakes. The good news: they’re well documented, and a competent installer already knows them.
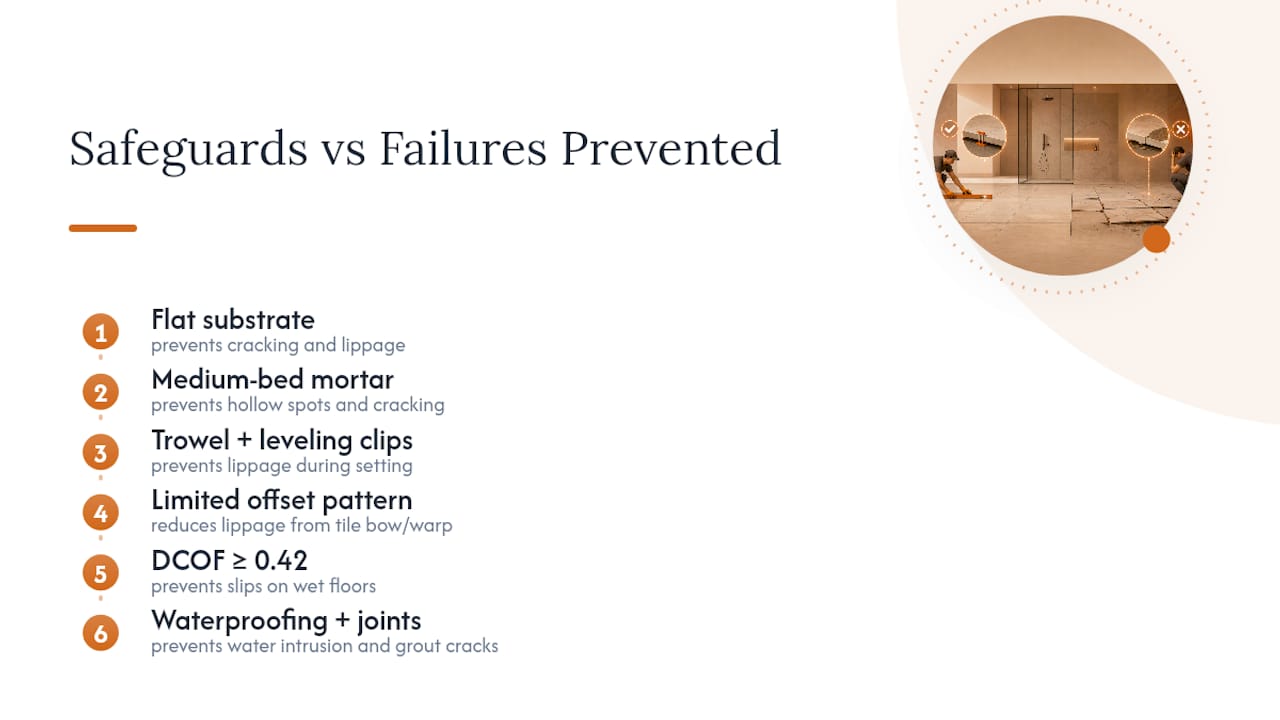
1. Get the substrate flat before anything else. Industry guidance calls for a flatness tolerance of about 1/8 inch over 10 feet for any tile with an edge 15 inches or longer. That’s noticeably tighter than what smaller tile tolerates, and it’s the single most common reason large panels crack or develop lippage. If your subfloor or wall isn’t there yet, budget for a self-leveling compound or additional backer board before tile day.
2. Use the right mortar, and back-butter every piece. Standard thin-set doesn’t have the body to support large, heavy panels without voids. Medium-bed mortar, sometimes labeled as large-and-heavy-tile mortar, is built for this. Combine it with back-buttering, applying mortar to the tile itself in addition to the substrate, and you’re aiming for very high mortar coverage in wet areas like showers. Anything less leaves hollow spots where water pressure and thermal movement eventually crack the tile.
3. Match the trowel to the tile, then use leveling clips. A larger notched trowel moves more mortar and reduces the ridges that cause uneven coverage. On top of that, leveling clip systems have become close to standard practice for 24×48 panels and larger. Professionals increasingly treat leveling clips as essential rather than optional, since they physically hold adjacent tiles at the same plane while the mortar cures. Skip them, and even a careful setter can end up with lippage once the mortar sets and the tiles settle slightly out of alignment.
4. Watch your offset pattern. A traditional 50 percent brick offset looks fine on small tile, but on large panels it amplifies any bow or warp in the tile itself, creating visible lippage at the seams. Most installers now recommend a stacked layout or an offset limited to less than half the tile length for anything 24 inches or longer on one side.
5. Confirm the slip rating before you finalize a floor tile. For wet floor applications, aim for a DCOF of 0.42 or higher. Polished and high-gloss finishes almost always fall short of this number, which is why matte and textured finishes are the safer default for any bathroom floor, large format or not.
6. Waterproof before you tile, not after. Shower walls need a proper membrane or foam backer system behind the tile, not just a moisture-resistant board. And wherever the tile meets a different plane, a wall-to-floor transition, a niche corner, an inside corner, you need a flexible movement joint. Grout is rigid. Buildings move. Skip the joint and you’re setting up a future crack.
Common failure causes, in order of how often they show up: inadequate mortar coverage, skipped back-buttering, a 50 percent offset on slightly bowed tile, and skipped waterproofing behind shower walls. Every one of these is a technique failure, not a tile failure.
Where Should You Actually Use Large Format Tile?
Not every surface in a bathroom is a good candidate, and pretending otherwise is how projects go wrong.
Walls and shower walls are the best application, full stop. Vertical surfaces don’t carry foot traffic, so slip resistance isn’t a factor, and the continuous panel effect is most dramatic where you’re not walking on it. This is where vein-matched slabs and 24×48 formats earn their reputation.
Shower floors are a different story. Slope toward the drain and slip resistance both matter more than aesthetics here, which is why most designers still favor smaller-format or mosaic tile on the shower pan. If you’re set on a large-format shower floor, it’s achievable, but it usually requires a linear drain and precise sloping that not every installer can execute well.
Bathroom floors outside the shower have more flexibility, but stick to matte or textured large-format tile and confirm that DCOF rating before you buy.
The mixed-format approach solves most of these tensions at once:
- Large panels on shower walls and the main field for the openness effect.
- Smaller textured tile or mosaic on the shower floor and pan for traction and drainage.
- A mosaic niche or accent strip to break up the field without cluttering it.
What Does a Large Format Tile Bathroom Actually Cost?
Material costs for large-format porcelain typically start in the mid range for standard collections and climb quickly once you move into premium slab lines with marble-look veining or specialty finishes. That range widens further with slab panels, which cost more per square foot than standard 12×24 or 24×24 tile simply because they’re harder to manufacture and ship without damage.
Labor is where the real budget swings happen. A crew experienced with large-format installation charges more than a standard tile-setting rate, and that premium buys you the substrate prep, mortar technique, and leveling system work that determines whether the tile lasts.
Line items to budget for beyond the tile itself:
- Substrate flattening or self-leveling compound, if your current floor or wall doesn’t meet the 1/8 inch over 10 feet standard.
- Waterproofing membranes or foam backer systems for any shower wall or floor.
- Premium grout or epoxy grout, which resists staining better than standard sanded grout over the life of the tile.
- Extra tile for cuts and waste, since large panels generate more unusable offcuts than small tile does per square foot.
The upfront number is higher than a standard tile job, but porcelain’s density and low maintenance needs tend to offset that over the life of the bathroom. Full bathroom remodel cost breakdowns can help you see how tile fits into the total project budget before you commit to a size or finish.
How Do You Choose the Right Size, Finish, and Grout?
Getting the spec right before you order tile saves you from expensive mistakes once installation starts.
-
Match tile size to the room’s scale. A tiny powder room can still handle 12×24 tile run vertically, but jumping straight to 24×48 slabs in a cramped space can look oversized. Let sightlines guide the decision, not just square footage.
-
Order full-size samples, not just swatches. Vein-matching and color variation only show up at scale. A 4×4 sample tells you almost nothing about how a 24×48 panel will read on your wall.
-
Pick finish by function. Matte or textured finishes belong on floors, where the DCOF should sit at 0.42 or above. Polished or honed finishes are better reserved for walls, where slip isn’t a concern.
-
Set your grout width around the tile’s rectification. Rectified tile supports tight 1/16 inch joints for that slab effect. Non-rectified tile needs wider joints to hide dimensional variance.
-
Choose grout color deliberately. A grout color close to the tile shade minimizes the joints and maximizes the continuous look. A contrasting grout highlights the layout, which works for geometric patterns but fights against the slab aesthetic.
-
Interview your installer about technique, not just price. Ask directly about mortar type, back-buttering, and whether they use leveling clips. Get warranty terms in writing.
-
Order 8 to 15 percent overage, depending on how many cuts your layout requires around fixtures, niches, and corners.
Pro Tip: Bring your bathroom’s actual dimensions, not estimates, when you visit a showroom. Large-format layouts are far less forgiving of miscalculation than small tile, where an extra cut piece barely registers.
If you want a second opinion on sizing and finish before you order anything, our guide on selecting bathroom tile walks through the tradeoffs in more detail, and our Tampa tile showroom lets you handle full-size samples in person.
How Does a Design-Build Remodeler Lower the Risk?
Every failure mode covered above traces back to sequencing and technique, which is exactly where a design-build model earns its keep. When design and construction sit under one roof, the person specifying the tile size and layout is in direct communication with the crew setting the substrate flat and mixing the mortar. That’s a very different situation than a homeowner coordinating a designer, a tile supplier, and an independent contractor separately and hoping the details line up.
Projects are structured with a dedicated Lead Carpenter who oversees substrate prep and installation sequencing from day one, so the flatness and mortar decisions get made by someone accountable for the finished wall, not just the demo schedule. A system is used to keep dust contained during the cutting and prep phase, which matters more than most homeowners expect when large panels require significant on-site cutting.
If you want to see how this plays out in finished bathrooms, our Tampa remodeling gallery shows large-format applications across a range of layouts and budgets.
Our Take on the Large Format Tile Debate
Most articles on this topic treat large-format tile as a style decision with a few installation footnotes tacked on at the end. That’s backwards. The tile itself is rarely the problem. The substrate prep, mortar selection, and installer technique are what separate a bathroom that looks stunning for fifteen years from one that starts showing cracked grout and popped tiles within eighteen months.
The conventional advice, “just make sure your installer has experience,” undersells how specific that experience needs to be. Setting a 24×48 panel is a different skill than setting 12×12 tile, not a scaled-up version of the same skill. A crew that’s never worked with medium-bed mortar or leveling clips will make mistakes that don’t show up until months after the grout dries.
If you’re evaluating a bathroom remodel with large-format tile, prioritize the installer’s specific track record with large panels before you fall in love with a particular slab pattern. The design will look good on day one regardless. What separates a good outcome from a costly redo is everything that happens before the tile ever touches the wall.
— MediaBeast
Ready to Start Your Large Format Tile Project?
If you’ve read this far, you already know the tile isn’t the hard part. Getting the substrate, mortar, and sequencing right is. Some design-build remodelers handle design and construction under one team, so the same people specifying your tile layout are accountable for the flatness and prep work that determines whether it holds up.
The process starts with up-front pricing, so you know your total investment, including substrate prep and waterproofing, before demo day. A dedicated Lead Carpenter stays on projects from start to finish, and a systematic dust containment approach is used through the cutting and setting phases that large-format tile requires. Browse real installations in our Tampa bathroom remodeling gallery, review typical bathroom remodel costs, and when you’re ready to talk specifics, schedule a discovery call with our designer to walk through your space and tile options.
Sources
- 24×48 Shower Tile: Complete Guide for Homeowners – D and G Flooring
- Large-Format Shower Tile Design Ideas – Arizona Tile