
Containment, source extraction, HEPA filtration, and HVAC protection are the four controls that actually stop renovation dust, and skipping any one of them lets fine particles migrate through the rest of your house. Set up a sealed work zone with negative pressure, require on-tool vacuum extraction, run a portable HEPA air cleaner, and vacuum daily with a HEPA machine. Ask your contractor to commit to all four in writing before demo day.
TL;DR:
- All four dust controls—containment, source extraction, HEPA filtration, and HVAC protection—must be implemented to prevent airborne particles from spreading during renovation.
- Building an airtight barrier with proper sealing, negative pressure, and continuous filtration is essential, as even small leaks can allow dust migration.
- Using on-tool vacuum extraction combined with appropriately sized HEPA air cleaners significantly reduces dust emissions at the source.
- Daily cleaning with HEPA vacuuming and damp wiping helps manage settled dust before it becomes airborne again, while dry sweeping can reintroduce fine particles.
- Proper sealing and shutting down HVAC systems, along with extended post-job ventilation, are critical to preventing dust from reaching other rooms and reducing health risks.
Table of Contents
- What Is Renovation Dust Control, Exactly?
- How Do You Build an Effective Dust Barrier?
- Does Negative Pressure Really Stop Dust From Spreading?
- Which Tools Actually Cut Airborne Dust at the Source?
- What’s the Right Daily Cleaning Routine During a Remodel?
- How Do You Keep Renovation Dust Out of Your HVAC System?
- When Does Renovation Dust Become a Hazard, Not Just a Nuisance?
- How Long Does Renovation Dust Actually Linger?
- What Should Go in Your Contractor’s Method Statement?
- What Does a Real Dust-Control System Look Like on the Job?
- Why Most Homeowners Get Dust Control Backward
- Ready for a Remodel That Doesn’t Take Over Your House?
- Where to Read More on Renovation Dust Control
- Sources
What Is Renovation Dust Control, Exactly?
Renovation dust control means managing airborne particles at three points: where they’re generated, where they travel, and where they settle. Most homeowners think dust control is a cleanup problem. It isn’t. It’s a containment problem first, an air-filtration problem second, and a cleanup problem last.
Once gypsum, wood, or masonry dust becomes airborne, it’s genuinely hard to catch. The HSE’s guidance on construction dust makes this point directly: fine particulates are difficult to contain once released, which is why source control and physical barriers matter more than a mop and a good vacuum after the fact. If you only plan for the cleanup stage, you’re already behind.
Here’s the quick version for anyone about to sign a contract or start a DIY project:
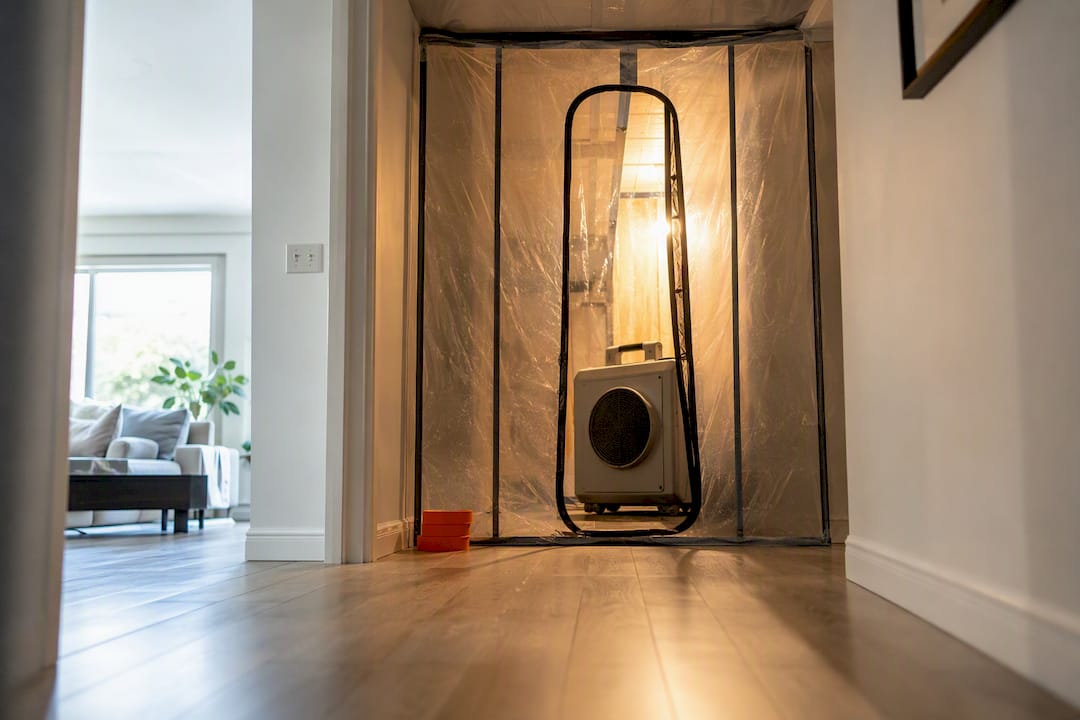
- Contain the work area with sealed plastic sheeting and a zippered access door.
- Depressurize the zone with an exhaust fan so air flows inward, not out.
- Filter the air with a portable HEPA unit running continuously.
- Protect the HVAC system by sealing registers and upgrading filters.
- Clean daily with a HEPA vacuum and damp wiping, never dry sweeping.
- Ventilate for 72 hours after major work wraps, per EPA remodeling guidance.
Pro Tip: Rent a box fan and a roll of 6 mil plastic before your project starts, even if you’re hiring a contractor. Having the supplies on hand means you can react fast if the crew’s containment plan is thinner than promised.
For supplies, you’re generally looking at plastic sheeting or a zip wall kit, tape, a box fan, a HEPA vacuum, and either owned or rented HEPA filters rated for your unit. Rental air scrubbers run in the range of $150 to $200 a week, which is cheap insurance against months of dust in your air ducts.
How Do You Build an Effective Dust Barrier?
The material matters less than the seal. Most professional crews use 2 to 6 mil polyethylene sheeting, with thicker plastic reserved for high-traffic zones or longer projects where the barrier needs to survive repeated foot traffic. Lightweight spring-pressure furring strips work fine for a quick, temporary wall between two rooms. Commercial zipper systems cost more but hold up better over multi-week jobs and make the access point far more airtight than a taped slit.
Here’s the setup sequence that actually works:
- Seal the floor first. Run plastic sheeting from the containment wall out several feet, taped down at the edges, before you build anything vertical.
- Build the wall. Whether it’s furring strips or a zipper system, anchor it to the ceiling, floor, and adjacent walls with minimal gaps.
- Seal penetrations. Outlets, light switches, vents, and gaps around door frames all need tape or foam.
- Install a zipper door, not just a flap. A self-closing slit lets crews pass through without holding the barrier open for ten seconds at a time.
- Check the ceiling line. Dropped ceilings and attic access points are the most commonly missed leak spot.
BRE’s guidance on construction dust recommends minimizing building penetrations altogether, which is worth remembering when a crew wants to run a vacuum hose through a wall gap instead of the zippered opening.
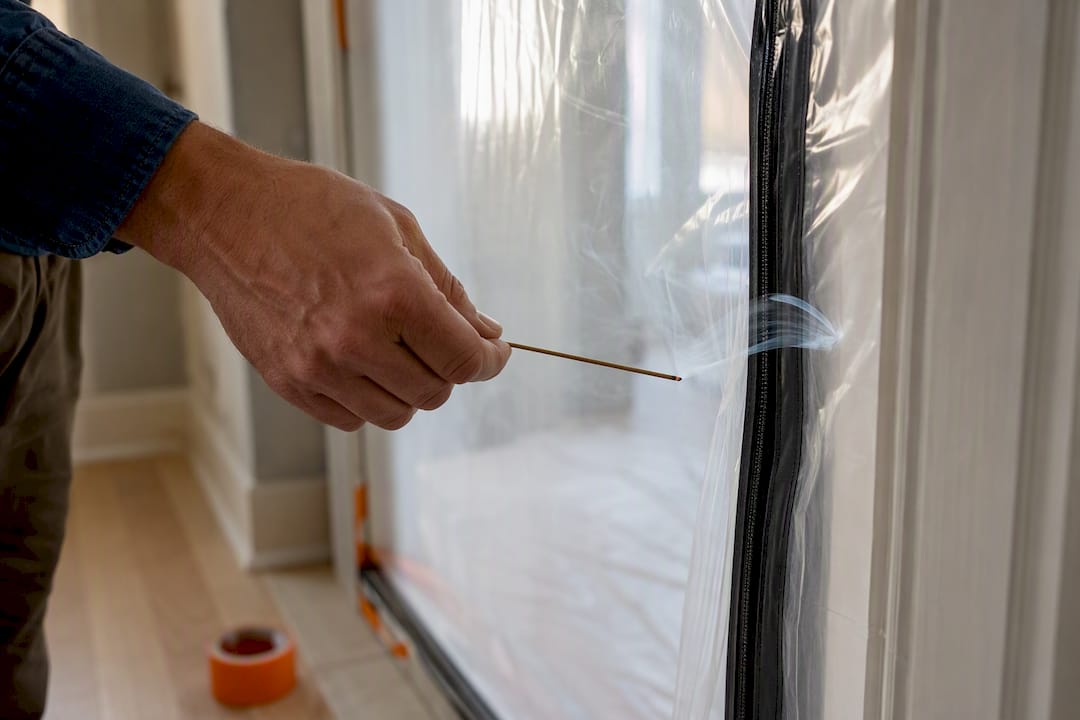
Pro Tip: Light an incense stick or a smoke pen near the containment door and watch which way the smoke moves. If it drifts into the work zone, your negative pressure is working. If it drifts out, you’ve got a leak, and it’s worth finding before the crew starts cutting.
Does Negative Pressure Really Stop Dust From Spreading?
Yes, and it’s the single most underused technique in DIY renovation dust control. Negative pressure means the work zone has slightly lower air pressure than the rest of the house, so air (and the dust riding on it) gets pulled into the work area instead of pushed out of it. You create this with an exhaust fan blowing air out a window, sealed around the frame with plastic and tape.
A few things matter more than people expect:
- Point the exhaust fan so it pulls air from inside the containment zone, not the room beyond it.
- Never vent hazardous or fine construction dust straight outdoors without a capture filter. If neighbors or landscaping sit close to the exhaust point, unfiltered dust just becomes their problem.
- If outdoor venting isn’t practical (apartment units, tight lot lines), rely on a portable HEPA air cleaner instead of trying to force air outside.
The EPA recommends ventilating work areas during installation and continuing that ventilation for at least 72 hours after completion to clear off-gassing from new paint, adhesives, and flooring materials. That 72-hour window is the number most homeowners get wrong. They stop running fans the moment the crew packs up, right when new materials are releasing the most volatile compounds. NIOSH’s construction indoor air quality guidance backs the same combination: negative pressurization plus HEPA filtration to keep dust from migrating into occupied space. Good ventilation planning at the design stage avoids a lot of this scramble later.
Which Tools Actually Cut Airborne Dust at the Source?
On-tool extraction, meaning a vacuum attached directly to a sander, saw, or grinder, catches dust before it ever becomes airborne. The HSE recommends prioritizing this kind of source control over relying on filtration and cleanup alone, and the logic holds up: a sander with a vacuum shroud can cut visible dust in a room dramatically compared to the same tool run bare. The limits are real too. Extraction shrouds slow down tight-corner work, and rental units with proper H/M/L class filters aren’t always available at a standard hardware store.
Portable HEPA air cleaners fill the gap extraction can’t close.
- Size the unit to the room, not the house. A machine rated for 300 square feet won’t do much in an open-concept kitchen and living area.
- Position it near the dustiest activity, not in a corner across the room.
- Replace filters more often during demo weeks. Heavy debris clogs a HEPA filter far faster than routine dust.
The strongest setup combines all three layers: extraction at the tool, a HEPA unit running in the containment zone, and exhaust pulling air outward. That layered approach captures both the coarse debris and the fine respirable particles that extraction alone tends to miss.
What’s the Right Daily Cleaning Routine During a Remodel?
Settled dust doesn’t stay settled. Foot traffic, closing doors, and even HVAC cycling can kick it back into the air, which is why daily cleanup isn’t optional busywork. It’s part of the control system.
- HEPA vacuum every horizontal surface at the end of each work day, including window sills, baseboards, and any furniture left in adjacent rooms.
- Damp-wipe hard surfaces rather than dry-dusting them. A dry cloth just relocates particles instead of capturing them.
- Damp-mop floors in and around the containment zone before anyone walks through barefoot.
- Fold plastic sheeting inward when it’s finally time to remove the barrier, trapping loose dust inside rather than shaking it into the room.
- Wipe top to bottom during final cleanup: ceiling fixtures first, then walls, then floors, so debris falls onto surfaces you’ll clean last.
- HEPA vacuum carpets and upholstery and replace HVAC filters immediately after major demo phases.
Dry sweeping and standard shop vacs without HEPA filtration do real damage here. A regular vacuum’s exhaust can push fine particles right back into the room, undoing a day’s worth of containment work in about ten minutes.
How Do You Keep Renovation Dust Out of Your HVAC System?
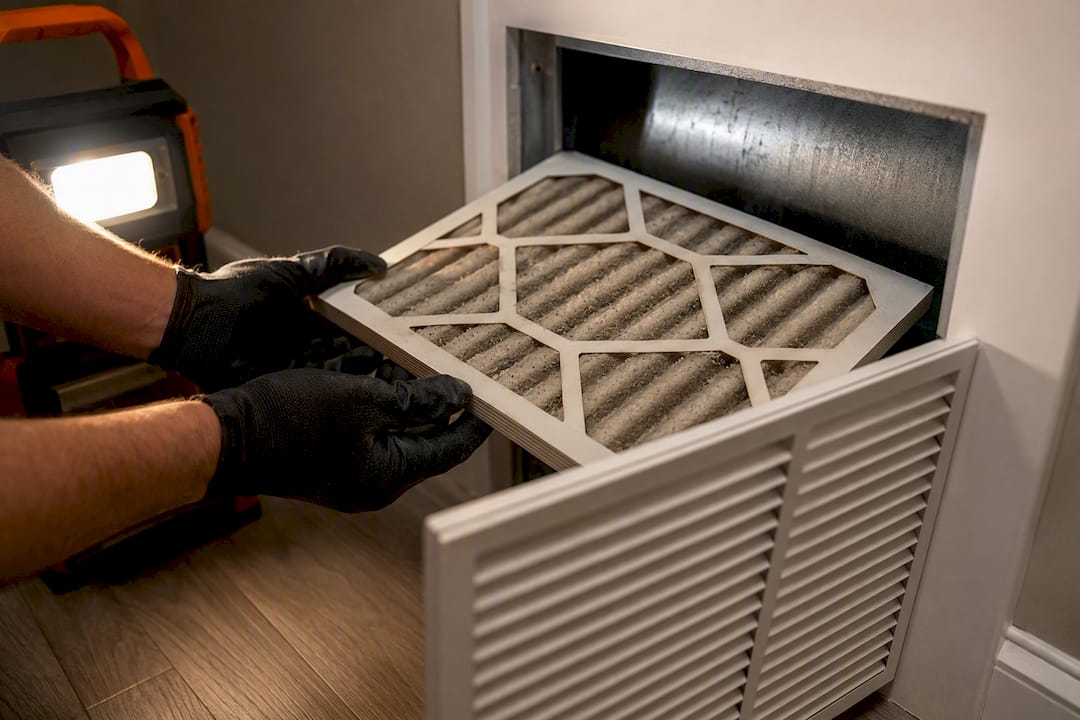
Your air handler is the fastest way dust spreads to rooms nowhere near the actual work. Seal supply and return registers in the containment zone with plastic and tape before demo starts, and don’t just tape over the grille; pull it off and seal the duct opening itself when possible.
- Isolating or shutting down the HVAC system entirely during heavy demo phases reduces circulation risk, but weigh that against comfort needs in extreme weather.
- Upgrade to the highest MERV rating your system supports, generally MERV 11 or higher, and swap filters more frequently during active work weeks.
- The EPA advises sealing ducts and avoiding material storage in mechanical rooms to keep pollutant loads down during a remodel.
Pro Tip: After any day with heavy sanding or demolition, check your return filter before the next work session starts. A filter that’s visibly gray after one day is a sign your containment has a leak worth chasing down.
Call an HVAC technician for inspection after major demo phases, especially if you smell dust when the system cycles or notice reduced airflow. That’s usually a sign dust reached the ductwork itself.
When Does Renovation Dust Become a Hazard, Not Just a Nuisance?
Age and material type change everything. Treat any paint in a home built before 1978 as a lead suspect until tested, since disturbing it without containment creates a genuine health exposure risk, not just a mess.
- Never dry-sand, dry-scrape, or grind suspected lead paint. Wet methods and licensed abatement contractors are the safe path.
- Suspected asbestos in flooring, insulation, or old drywall compound requires licensed abatement. This is not a DIY project under any circumstances.
- Visible mold behind walls or under flooring needs professional remediation, not a HEPA vacuum and good intentions.
- If suspicion arises mid-project, stop work, contain the area without venting it further, and get testing done before continuing.
Your contractor’s method statement should include a hazardous-material check as a line item, not an afterthought raised only if something looks off.
How Long Does Renovation Dust Actually Linger?
Demo days and heavy sanding produce the worst of it, but fine dust keeps re-suspending for hours or days afterward without active controls running. It doesn’t just settle once and stay put. The EPA’s 72-hour post-completion ventilation window exists because new materials keep off-gassing well after the crew leaves. Anyone with asthma, allergies, or young kids at home should consider staying elsewhere during the heaviest demo days, or at minimum sealing off bedrooms completely during that stretch.
What Should Go in Your Contractor’s Method Statement?
A method statement is the written plan that spells out exactly how dust gets controlled before a single wall comes down, and it belongs in your bid documents, not a verbal promise on-site.
- Containment design: barrier material, location, and access points.
- Negative-pressure method: fan size, exhaust location, and how it’ll be tested.
- HEPA units and air exchange targets for the space.
- On-tool extraction commitment for sanding, cutting, and grinding.
- Daily cleaning schedule and who’s responsible for it.
- Filter replacement frequency for both the HVAC system and any rental air scrubbers.
Ask for a smoke test on day one to confirm negative pressure is actually working, not just described on paper. Red flags worth walking away from: no containment plan at all, crews dry-sweeping instead of HEPA vacuuming, or a contractor who won’t commit anything to writing. A good bathroom remodel plan treats this as a planning-stage document, not a mid-project scramble.
Pro Tip: Put the filter-change frequency in writing with a specific number, like “HVAC filters replaced weekly during demo,” not a vague promise to “keep things clean.” Vague language is where dust control plans quietly fall apart.
What Does a Real Dust-Control System Look Like on the Job?
A well-structured dust control system uses dedicated oversight where a lead person manages containment and cleanup on every project, with dust control planned before demolition rather than improvised after. Homeowners evaluating any contractor should ask who’s personally accountable for daily cleanup, what containment method they use, and whether that plan gets written down anywhere. If a contractor can’t answer clearly, that’s worth noting before you sign.
Why Most Homeowners Get Dust Control Backward
The instinct is to worry about cleanup, buy a good vacuum, plan to wipe things down after. That’s backward. The research is consistent on this point: once dust is airborne, it’s already won half the battle against you. Containment and source extraction have to happen before a saw ever touches drywall, not after.
The other place conventional advice falls short is communication. Homeowners fixate on the physical controls, plastic sheeting, HEPA filters, fan placement, and skip the conversation about schedule and access. But friction usually comes from surprise, not dust itself: a family walking into a hallway they didn’t know would be sealed off, or a crew accessing a bathroom on a day nobody expected. A short daily check-in with your crew costs nothing and prevents most of the frustration people blame on dust.
If you take one thing from all this: prioritize the method statement over the tool list. A crew with a mediocre vacuum but a written containment plan will outperform a crew with expensive equipment and no plan, every time.
— MediaBeast
Ready for a Remodel That Doesn’t Take Over Your House?
Many contractors treat dust control as an afterthought, something you find out about when you’re already covered in it. A better approach includes a dedicated lead overseeing dust control, up-front pricing before work starts, and design plus construction managed by one team instead of handed between subcontractors who each blame the last guy for the mess.

Combined design-and-construction management means containment and cleanup get planned before a single wall opens up, not improvised once dust is already spreading. That’s the difference between a remodel that disrupts your home for weeks and one where you can still function in the rest of the house. If you’re planning a kitchen or bathroom project and want to see how a dust-minimized remodel actually runs, reach out for a consultation and ask about the Work Clean System directly. You can also browse the Tampa bathroom remodeling gallery to see finished projects before requesting a quote.
Where to Read More on Renovation Dust Control
The EPA’s remodeling and indoor air quality guidance covers ventilation and post-work off-gassing. NIOSH’s construction IEQ guidance details containment and negative pressure. The HSE’s CIS36 guidance explains tool-level source control and PPE. For living through a project day-to-day, see this survival guide for occupied renovations.
Sources
- Best practices for indoor air quality when remodeling your home — EPA
- Maintaining acceptable indoor environmental quality (IEQ) during construction and renovation projects — NIOSH/CDC
- Construction dust: health risks and control — HSE (CIS36)