
The most effective way to control remodeling dust is a layered system: contain the room, exhaust outward, capture at the tool with HEPA filtration, suppress with wet methods when safe, and finish with HEPA cleaning. Before you start, cover furniture and floors, seal HVAC registers, and pick one entry point for workers and materials. If your home was built before 1978 or has old plaster, test for lead, asbestos, or silica before disturbing anything.
TL;DR:
- Contain the work zone with sealed poly sheeting, a single entry point, and protective coverings on furniture and floors to prevent dust migration.
- Use a fan with a shroud to create negative pressure, exhausting dust outside and ensuring make-up air is supplied from a clean source like a crack in a window.
- Attach a true HEPA vacuum directly to power tools during cutting, sanding, or grinding to capture dust at its source, minimizing airborne particles.
- Apply water or damp methods for cutting masonry and for surface wiping to reduce dust release and ensure regular filter and duct inspection after heavy work.
- Hire a contractor with a documented dust-control plan, including proper sealing, ventilation, source capture, and detailed post-project cleaning procedures.
Table of Contents
- Plan and set up the work zone
- Ventilation and negative pressure: exhausting dust outside safely
- Source capture and tool choices that stop dust at the cut
- Wet methods and safe suppression tactics
- Protecting HVAC and ducts from becoming a dust redistributor
- Cleaning sequence and timing for a truly dust free remodeling finish
- Hazardous dust: when lead, asbestos, or silica changes the plan
- For a smooth bathroom renovation, follow our detailed bathroom remodel checklist: your step-by-step guide before starting work.
- How Bath & Kitchen Gallery applies dust control on a real job
- What the trades know about avoiding dust-related callbacks
- Hire a dust-aware remodeler for your next project
- Sources
- FAQ
Plan and set up the work zone
Containment is the foundation of every other control. The EPA’s remodeling best-practices guidance recommends covering openings with 6-mil polyethylene sheeting and sealing supply and return registers before demolition starts, since dust that escapes the work zone in the first hour is nearly impossible to fully recover later.
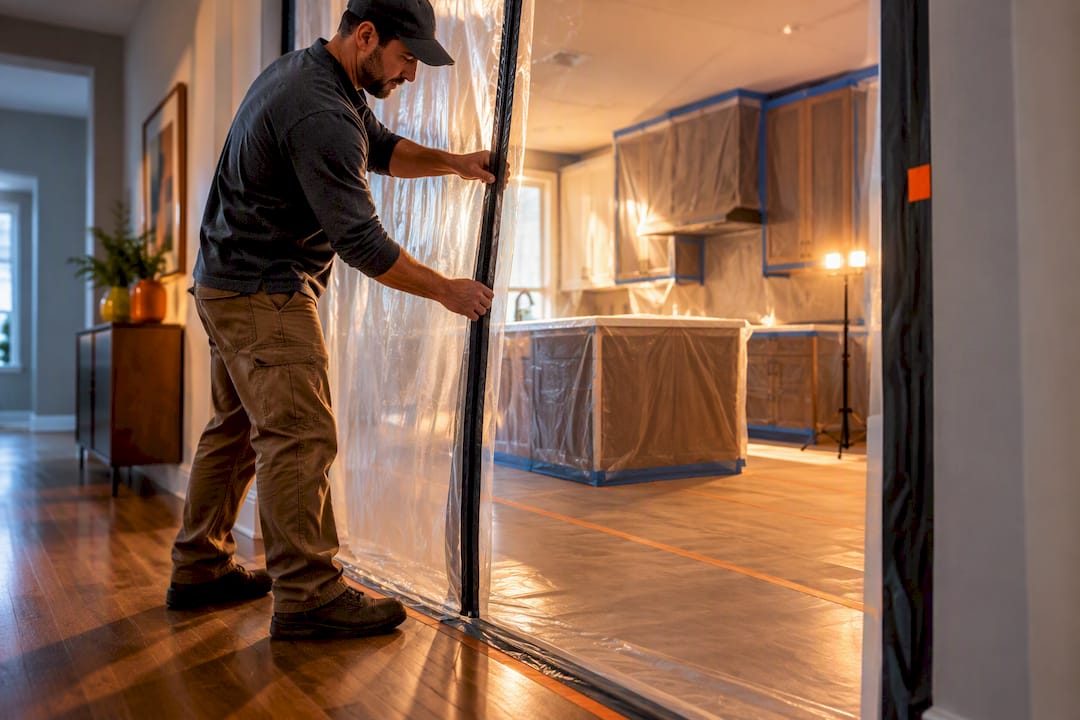
Start by choosing a single access point for workers, tools, and debris. Multiple doorways in and out multiply the chances dust rides along on shoes, clothes, or a propped-open door. Build a zipper door or simple airlock at that entry, using 6-mil poly and tape rated for the wall or trim surface you’re sealing it to.
Once the airlock is up, work outward. Hang overlapping poly sheets from ceiling to floor, taped at every seam, and pay special attention to penetrations: ceiling fixtures, HVAC boots, electrical outlets, and gaps around door casings. NIOSH’s guidance on maintaining indoor air quality during renovation work identifies these small, unsealed openings as the most common way dust migrates into occupied parts of a home.
Protect what stays in the room. Furniture, flooring, and fixtures need overlapping drop cloths or poly with taped seams, not just a loose sheet thrown over the top. Dust finds gaps.
- Tape a zipper door or poly flap at the single work-zone entrance.
- Seal HVAC registers, outlets, and ceiling penetrations with poly and tape.
- Cover furniture and flooring with overlapping sheeting, seams taped shut.
- Set a fixed worker and debris route that avoids finished living space.
Pro Tip: Run a strip of painter’s tape along the floor to mark the “clean line” workers should never cross without changing shoe covers.
If you’re planning a full kitchen or bathroom renovation, our guide to living at home during a kitchen remodel walks through how to keep daily routines running while the work zone stays sealed.
Ventilation and negative pressure: exhausting dust outside safely
Containment only works if air actually moves out of the sealed room instead of leaking into the rest of the house. That’s where negative pressure comes in: a fan pulling more air out of the work zone than comes in through gaps, so any stray dust gets pulled toward the exhaust instead of into your hallway.
Position a box fan or inline exhaust fan in a window opening, and build a simple shroud around it using cardboard or foam board so the fan seals the gap tightly rather than leaving open space around the edges. The tighter the shroud fits, the more effective the negative pressure.
A layered system of barriers, exhaust ventilation, and HEPA filtration is what EPA and NIOSH guidance recommend for controlling dust migration during renovation work, rather than any single tactic on its own.
Make-up air matters more than most homeowners expect. If you seal a room tightly and run an exhaust fan without letting replacement air in from outside, the fan can struggle to maintain pressure, or air can reverse direction and pull dust back through gaps instead of out the window. Crack a window on the opposite side of the room, away from the exhaust fan, to give the system somewhere to draw air from.
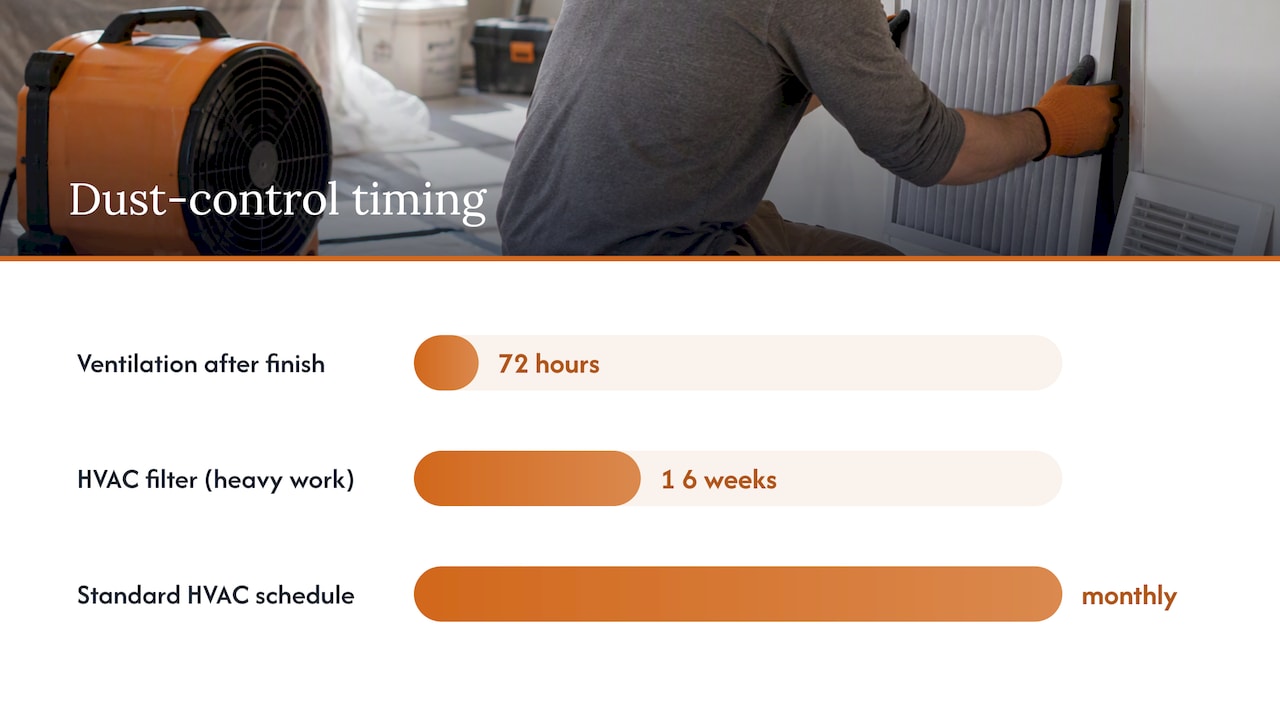
Keep exhaust running during active work and continue ventilating for 72 hours after installing finishes like paint, adhesives, or new flooring, which is the window EPA cites for off-gassing and fine particulate to clear. Cold or wet weather can make cracking a second window impractical, so plan alternate make-up air paths, like a door to an unheated garage, ahead of time.
- Build a tight-fitting shroud around your exhaust fan using foam board or cardboard.
- Crack a second window for make-up air, positioned away from the exhaust fan.
- Run exhaust ventilation throughout active work and for 72 hours after finishing work.
Bathrooms present their own ventilation challenges, especially in older homes without adequate exhaust fans already installed. Our piece on ventilation in bathroom remodels covers what a properly sized fan setup looks like for that specific space.
Source capture and tool choices that stop dust at the cut
The dust you never let into the air is the dust you never have to clean up. That’s the logic behind source capture: attaching a HEPA vacuum directly to the tool making the cut, so debris gets pulled away at the point of creation instead of spreading through the room.
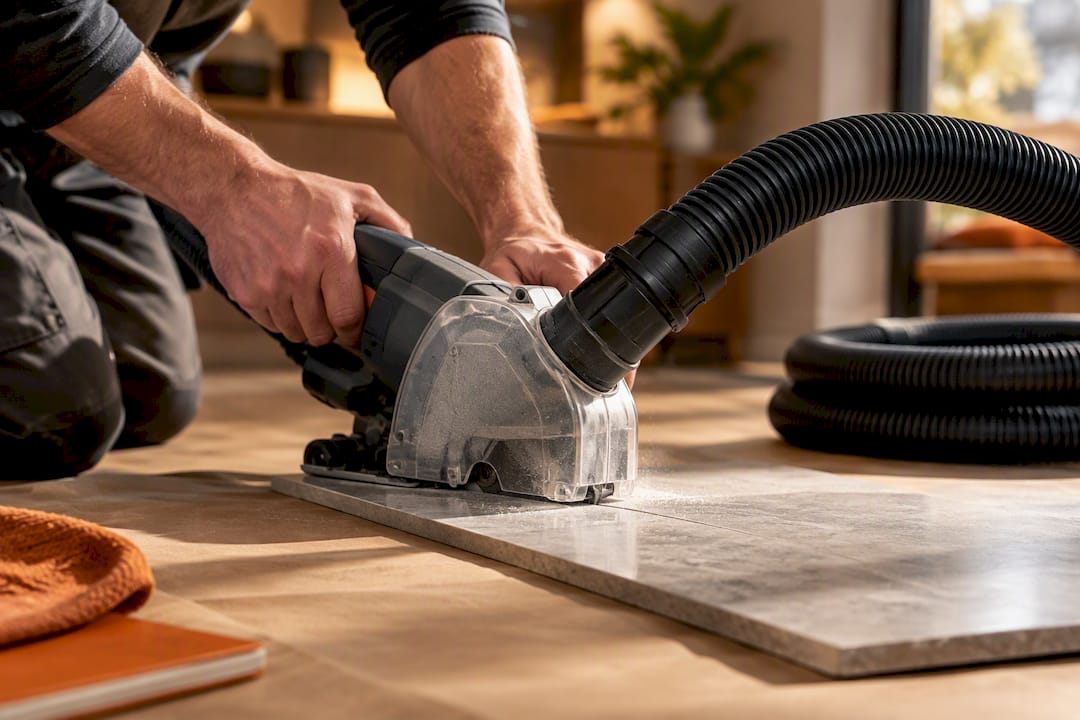
Not every vacuum labeled “HEPA-filtered” performs the same. A true HEPA filter captures at least 99.97% of particles at 0.3 microns, the size range that includes silica dust and fine wood particles that can stay airborne for hours. A shop vacuum with a basic filter bag lets much of that fine material pass straight through and back into the room air.
Shrouded tools make source capture practical for everyday tasks. A random-orbit sander with a dust-collection shroud, connected to a HEPA vac through a tool-triggered outlet, captures sanding dust before it ever leaves the sanding pad. The same principle applies to circular saws and grinders fitted with dust shrouds. Compare that to an unshrouded angle grinder cutting tile, which throws visible dust clouds regardless of how well the room is sealed.
- Confirm any rented or purchased vacuum is certified HEPA, not just “HEPA-style.”
- Use shrouded sanders, saws, and grinders wherever the tool has one available.
- Choose tool-triggered vacuum outlets so capture starts the moment the tool does.
- Favor hand sanding or slower tool speeds on small areas where shrouding isn’t practical.
Pro Tip: Rent a HEPA vac with a tool-triggered outlet for the week rather than buying one outright: for most homeowner projects, the rental cost is a fraction of a professional-grade unit and delivers most of the same benefit.
Renting equipment for a single project usually makes more financial sense than buying, and most tool-rental counters stock shrouded sanders and HEPA-rated extractors alongside standard power tools. The trade-off is availability: book ahead if your project falls during a busy renovation season.
Wet methods and safe suppression tactics
Water is one of the simplest tools for keeping dust out of the air, but it only works in the right situations. A light mist applied to drywall before scoring, or to debris before sweeping, weighs particles down so they settle instead of becoming airborne. Damp wiping surfaces during work, rather than waiting until cleanup, keeps dust from accumulating and later getting kicked back into the air by foot traffic.
For cutting masonry, tile, or stone, a wet saw or a vacuum-assisted shroud dramatically cuts the amount of silica dust released compared to a dry cut. Local public-health guidance in cities like Philadelphia specifically recommends wet methods and vacuum-assisted shrouds for demolition and cutting operations where dry-cutting would otherwise send fine particulate into the air.
Wet methods aren’t universal, though. Avoid misting near open electrical outlets or exposed wiring, on finishes that water can stain or warp, or in areas where standing water creates a slip hazard on plastic sheeting or bare subfloor.
- Mist drywall and debris lightly before sweeping or bagging.
- Use a wet saw or vacuum-assisted shroud for cutting tile, stone, or masonry.
- Damp-wipe work surfaces throughout the day, not only at cleanup.
- Skip wet methods near live electrical work or on water-sensitive finishes.
Protecting HVAC and ducts from becoming a dust redistributor
A sealed room does no good if the dust finds its way into your ductwork and gets blown into every other room in the house. HVAC systems are one of the easiest paths for renovation dust to travel far beyond the work zone, and one of the easiest to overlook.
Cover every supply and return register in the work area, and in nearby hallways the work zone connects to, before demolition starts. EPA’s technical bulletin on duct protection during construction recommends covering register boots and avoiding operation of the central system during dusty tasks whenever possible, since running the blower while registers are open pulls fine particulate straight into the ducts.
If you can’t shut the system down entirely, for example during a summer project where cooling is necessary, use a temporary, higher-efficiency filter at the return and plan to replace it more frequently than usual.
EPA’s duct-protection bulletin recommends inspecting and cleaning ducts and filters after heavy construction dust work to prevent the system from redistributing trapped dust for weeks or months after the project ends.
- Cover supply and return registers in the work zone and adjacent hallways.
- Avoid running central HVAC during dusty demolition or sanding when possible.
- Swap to a temporary higher-efficiency filter if the system must run.
- Replace filters and inspect ducts once heavy dust work is finished.
Ask your contractor for photos of covered registers and the final filter swap. Documentation like this is a simple way to confirm the protection actually happened, rather than taking it on faith.
Cleaning sequence and timing for a truly dust free remodeling finish
Cleanup order matters as much as cleanup effort. Sweeping or dry-dusting first just launches settled particles back into the air, undoing hours of containment work. The correct sequence starts with HEPA vacuuming, moving from high surfaces to low ones, followed by damp wiping, then a second HEPA vacuum pass once surfaces have dried.
- HEPA vacuum every surface starting with ceilings and light fixtures, working down to floors.
- Damp-wipe all surfaces with clean water or a mild cleaner, changing rags and water often.
- Run a second HEPA vacuum pass once surfaces are fully dry.
- Replace the HVAC filter as a final step before removing containment barriers.
For projects running more than a few days, empty HEPA vacuum canisters or bags outside rather than indoors, since disturbing a full canister indoors can release trapped fine dust right back into the room. During heavy sanding or demolition phases, plan to change HVAC filters every one to two weeks instead of waiting for the standard monthly schedule.
Pro Tip: Keep a second, clearly labeled vacuum canister just for emptying outside: swapping canisters takes seconds and avoids dragging a dusty machine through finished parts of the house.
Dust doesn’t disappear the moment work stops. Fine particulate can remain airborne or resettle on surfaces for hours after active work ends, which is part of why ventilation continues for 72 hours after finishing work rather than stopping the moment the crew leaves. A genuine final clean means every surface, not just the visible ones, gets the full HEPA vacuum and damp wipe sequence, including inside cabinets, on top of door casings, and along baseboards where fine dust tends to settle last.
Hazardous dust: when lead, asbestos, or silica changes the plan
Standard containment and HEPA cleaning are built for ordinary construction dust, not hazardous materials. Homes built before 1978 commonly have lead-based paint, and older plaster, floor tile, pipe insulation, and some textured ceiling finishes can contain asbestos. Cutting concrete, tile, brick, or stone releases silica dust regardless of the home’s age.
NIOSH and OSHA guidance treats respirators as a last line of defense, useful only after engineering controls like containment and source capture are already in place, and only when paired with proper fit testing and a respiratory-protection program rather than a mask grabbed off a hardware store shelf.
Field research backs up why engineering controls come first: a NAHB study for the EPA measured lead dust during renovation and repair work and found that misting surfaces combined with HEPA vacuuming and wet wiping produced large reductions in both airborne and surface lead dust.
- Test suspect materials before disturbing them if your home predates 1978 or has original plaster or tile.
- Treat respirators as a backup control, not a substitute for containment and source capture.
- Hire a certified lead-safe or licensed asbestos abatement contractor when testing confirms a hazard.
- Never dry-sand or dry-cut a material you haven’t ruled out as lead, asbestos, or high-silica.
When test results come back positive, DIY dust control stops being the right call. Certified abatement contractors carry the equipment, training, and disposal permits that ordinary containment can’t substitute for.
For a smooth bathroom renovation, follow our detailed bathroom remodel checklist: your step-by-step guide before starting work.
A working plan is only useful if you can follow it without rereading a full guide every morning. Break the process into three simple stages.
- Pre-job: clear the room, cover what stays, tape off registers, and set the single entry point.
- Daily: run exhaust ventilation, empty the HEPA vac outside, and damp-wipe high surfaces.
- Post-job: run a full HEPA clean, swap the HVAC filter, and request photo documentation.
| Stage | Key actions | Why it matters |
|---|---|---|
| Pre-job | Cover items, seal registers, set entry point | Stops dust migration before it starts |
| Daily | Run exhaust, empty vac outside, damp-wipe | Prevents buildup and resettling |
| Post-job | HEPA clean, filter swap, documentation | Confirms protections actually worked |
Reviewing common pitfalls before demolition begins can also save real cleanup time. Our piece on common bathroom remodeling mistakes covers several dust-related missteps homeowners run into during planning.
How Bath & Kitchen Gallery applies dust control on a real job
Professional crews build dust control into the job from the first day rather than treating it as cleanup at the end. Bath & Kitchen Gallery combines design and construction under one roof, gives homeowners up-front pricing with a detailed item list, and assigns a dedicated Lead Carpenter to oversee each project. Its Work Clean System applies the same layered logic covered above: containment, source capture, and structured daily cleaning, managed by one point of contact rather than left to chance between subcontractors.
When you’re evaluating a contractor’s dust-control approach, ask what documentation they provide along the way.
- A written dust-control plan specific to your project’s scope and layout.
- A daily cleaning checklist the crew actually follows, not just promises.
- Documented HVAC protection steps, ideally with before-and-after photos.
- A final walk-through sign-off confirming containment came down clean.
You can see how this plays out on real projects in our remodel testimonials, where homeowners describe what the day-to-day experience looked like.
What the trades know about avoiding dust-related callbacks
Simple habits prevent most dust complaints before they happen: a proper airlock at the doorway, a fixed vacuum station near the work area, and a worker route that never crosses finished flooring. Crews that skip these steps end up back on-site fixing dust-damaged finishes or repainting hallways that should have stayed clean.
When you’re vetting a contractor, ask for their dust-control plan in writing, not a verbal assurance. A crew that can describe exactly how they’ll seal, exhaust, and clean has usually done it enough times to get it right the first time.
— MediaBeast
Hire a dust-aware remodeler for your next project
Reading about layered dust control is one thing. Living through weeks of demolition without it is another. A professional remodeler manages design and construction together, so the same team planning your kitchen or bathroom also manages containment and cleanup, supported by up-front pricing and a dedicated project lead overseeing a dust-control system from the start.

Before you sign with any contractor, ask three questions: Do you have a written dust-control plan for this specific project? How will you protect the HVAC system during demolition? Can I see before-and-after photos from a recent job?
- Design and construction managed by a coordinated team to minimize handoff gaps where dust control may fail.
- Up-front, itemized pricing to promote transparency about project costs, including dust control efforts.
- A dedicated project lead overseeing daily containment and cleaning efforts.
If a bathroom renovation is next on your list, start with our bathroom remodel cost guide to see project ranges and request a plan built around your space.
Sources
The guidance in this article draws on official channels: the EPA’s remodeling best-practices page for containment and ventilation, NIOSH’s indoor air quality guidance for negative pressure and migration routes, EPA’s duct-protection bulletin for HVAC safeguards, and NIOSH respirator guidance alongside the NAHB lead-dust study for hazardous-material precautions. Consult these directly for technical or regulatory detail specific to your project.
- Best Practices for Indoor Air Quality when Remodeling Your Home | US EPA
- Maintaining acceptable indoor environmental quality (IEQ) during construction and renovation projects | NIOSH/CDC
FAQ
How long does it take renovation dust to settle?
Fine dust can stay airborne for hours after active work stops, which is why ventilation should continue for 72 hours after installing finishes like paint or flooring. Settled dust can also get kicked back into the air by foot traffic until a full HEPA vacuum and damp-wipe cleaning pass is complete.
How do you get rid of dust after a renovation?
Vacuum every surface with a true HEPA filter first, working from ceilings down to floors, then damp-wipe those same surfaces before running a second HEPA pass once they’re dry. Finish by replacing the HVAC filter, since ducts can hold and redistribute trapped dust for weeks afterward.
What is the best method of dust control?
No single tactic works alone: the most effective approach layers containment barriers, exhaust ventilation with negative pressure, HEPA source capture at the tool, wet suppression, and HEPA cleaning. Skipping any one layer, like sealing a room without exhausting air outward, lets dust find another way to spread.
How can I stop my house from being so dusty during a remodel?
Seal the work area with 6-mil poly, cover HVAC registers, and set up an exhaust fan to keep air moving outward instead of into the rest of the house. Pair that with a HEPA vacuum for daily cleanup and damp wiping instead of dry sweeping, which just sends settled dust back into the air.