
Quick answer: perimeter counters usually extend 1 to 1.5 inches beyond the cabinet face. Island seating needs about 12 inches at minimum, with 15 inches more comfortable for counter-height stools, and 12 inches typical at bar height. Material thickness changes how far any of that can extend without hidden support underneath.
TL;DR:
- Overhangs usually extend 1 to 1.5 inches beyond the cabinet face, but actual support is necessary for spans exceeding 8 to 12 inches depending on material thickness.
- Seating overhangs should be at least 12 inches at bar height and 15 inches at standard counter height for comfortable use, with space each seat about 24 inches apart.
- Unsupported stone overhang limits vary between 6 inches for 2 cm slabs and up to 12 inches for 3 cm slabs, with brackets or corbels needed beyond those spans.
- Precise measurements and support planning must be finalized before templating, including slab thickness, support placement, and appliance sizes to prevent costly adjustments.
- Proper coordination between design and construction, including support anchoring into framing, reduces risks of cracks, deflection, and warranty issues.
Table of Contents
- What a countertop overhang actually is
- Standard perimeter overhangs and installation tolerances
- Island and peninsula seating depth: 12 inches versus 15 inches
- Material limits and support options for unsupported spans
- How to measure and plan overhangs with your fabricator
- Common problems and fixes: cracks, knee contact, and warranty issues
- Design and build checklist from a remodeler’s perspective
- Pick comfort, then engineer the support
- How Bath & Kitchen Gallery plans overhangs that hold up
- FAQ
- Sources
What a countertop overhang actually is
An overhang is the distance a countertop extends past the cabinet face, finished end, or island base below it. You measure it from the finished cabinet face, not the wall or the drawer front, straight out to the counter’s edge. That number does three different jobs depending on where it sits in your kitchen.
- A perimeter lip sheds spills and crumbs away from cabinet doors and drawers.
- A seating overhang creates knee clearance so someone can sit at the counter without hitting their legs on cabinetry.
- A decorative edge projection, like a bullnose or waterfall detail, is mostly visual and carries no structural load on its own.
Applied moldings, face-frame lips, and built-in appliances all eat into usable legroom, so the overhang you specify on paper is rarely the overhang you actually sit at.
Standard perimeter overhangs and installation tolerances
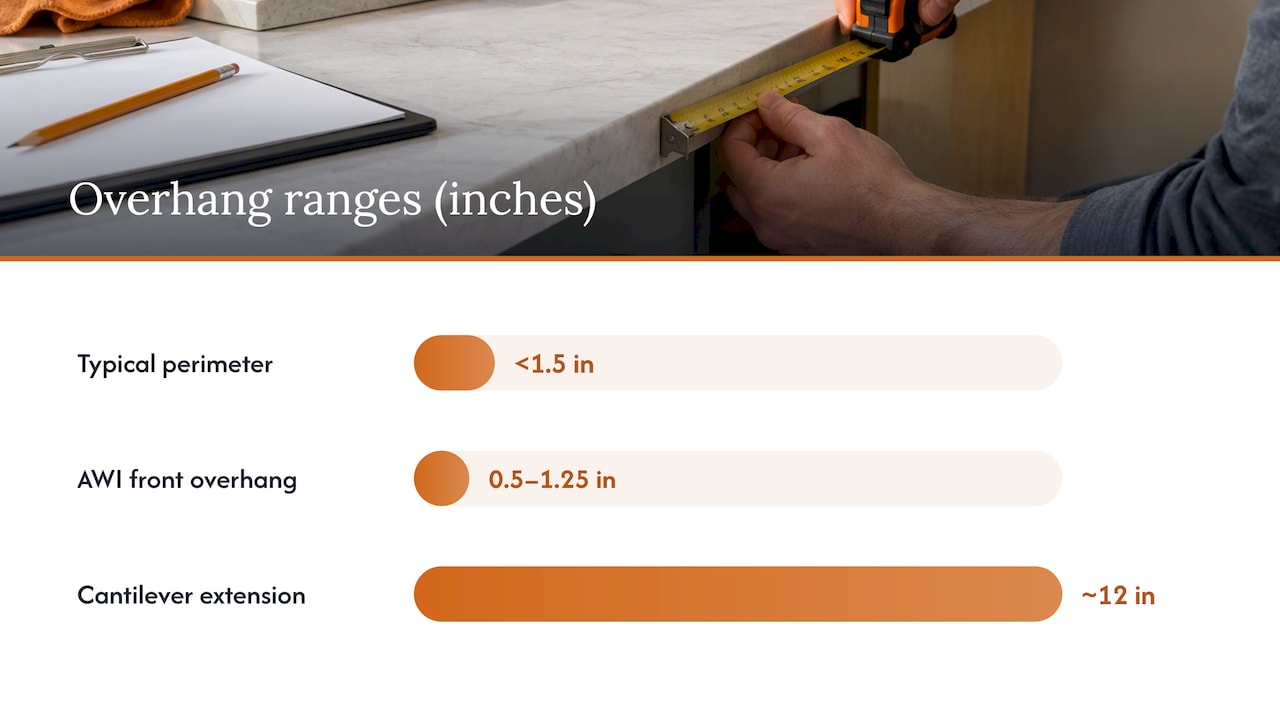
Most kitchens use a small perimeter overhang on countertops that sit above base cabinets, generally under about 1.5 inches. That range clears cabinet door and drawer fronts without wasting usable counter depth.
AWI guidance places acceptable front overhangs on cabinetwork between about 0.5 inch and 1.25 inches, and it limits suspended or cantilevered extensions to roughly 12 inches unless the fabricator specifies otherwise, according to the Architectural Woodwork Institute. That tighter range explains why a fabricator sometimes pushes back on a 1.5 inch overhang request, especially on cabinetwork built to AWI specification rather than typical stock cabinets.
Perimeter overhangs shrink in real kitchens more often than they grow. A dishwasher panel, a tight run next to a wall oven, or a finished end panel can all force the overhang down to a half inch in spots. When that happens, note the exact location in writing and confirm it with your fabricator before templating, so the shrunk section does not get flagged as an installation error later.
Island and peninsula seating depth: 12 inches versus 15 inches
The seating overhang question is really a knee clearance question, and the answer depends on counter height. NKBA-based guidance points to about 15 inches of overhang at standard 36 inch counter height, and about 12 inches at 42 inch bar height, because the body sits closer to a taller counter.
- 36 inch counter height: 15 inches recommended, 12 inches minimum.
- 42 inch bar height: 12 inches typical.
- 18 inch table height: wider clearance needed, closer to standard dining table depth.
The paradox here is that 12 inches sounds generous on a tape measure but feels tight once an adult actually sits down, because a stool seat and a person’s thighs take up more horizontal space than the overhang number suggests. Design commentary on island seating backs this up: 12 inches is often described as workable but cramped, while 15 inches gets described as comfortable.
Space each seat about 24 inches center to center so elbows do not collide, a rule covered in more detail in this kitchen island size overview.
Pro Tip: If your island is tight on depth, borrow the extra 3 inches from the cabinet side rather than shrinking seat spacing.
Material limits and support options for unsupported spans
Overhang depth is only half the equation. The other half is whether the slab can hold that overhang without cracking or sagging, and that comes down to material and thickness.
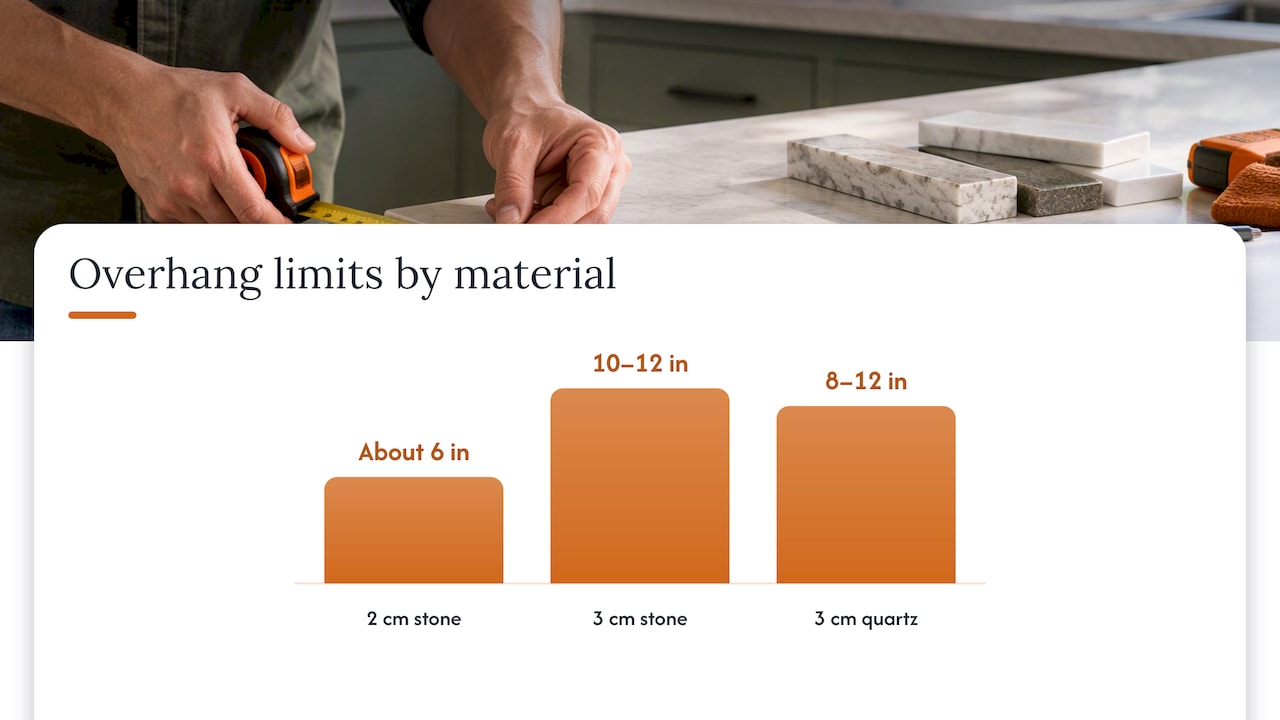
Thinner 2 cm stone flexes more under point load, so its safe unsupported span is shorter than 3 cm stone of the same material, according to fabrication guidance on core materials used under stone overhangs. Many quartz manufacturers cap unsupported overhangs around 8 to 12 inches, and going past that figure can void the warranty.
| Stone thickness | Typical unsupported limit | Common reinforcement past that limit |
|---|---|---|
| 2 cm stone | About 6 inches | Plywood substrate, steel rod |
| 3 cm stone | About 10 to 12 inches | Flat bar, angle brackets, corbels |
| 3 cm quartz | Often 8 to 12 inches per manufacturer | Plywood substrate with embedded flat bar |
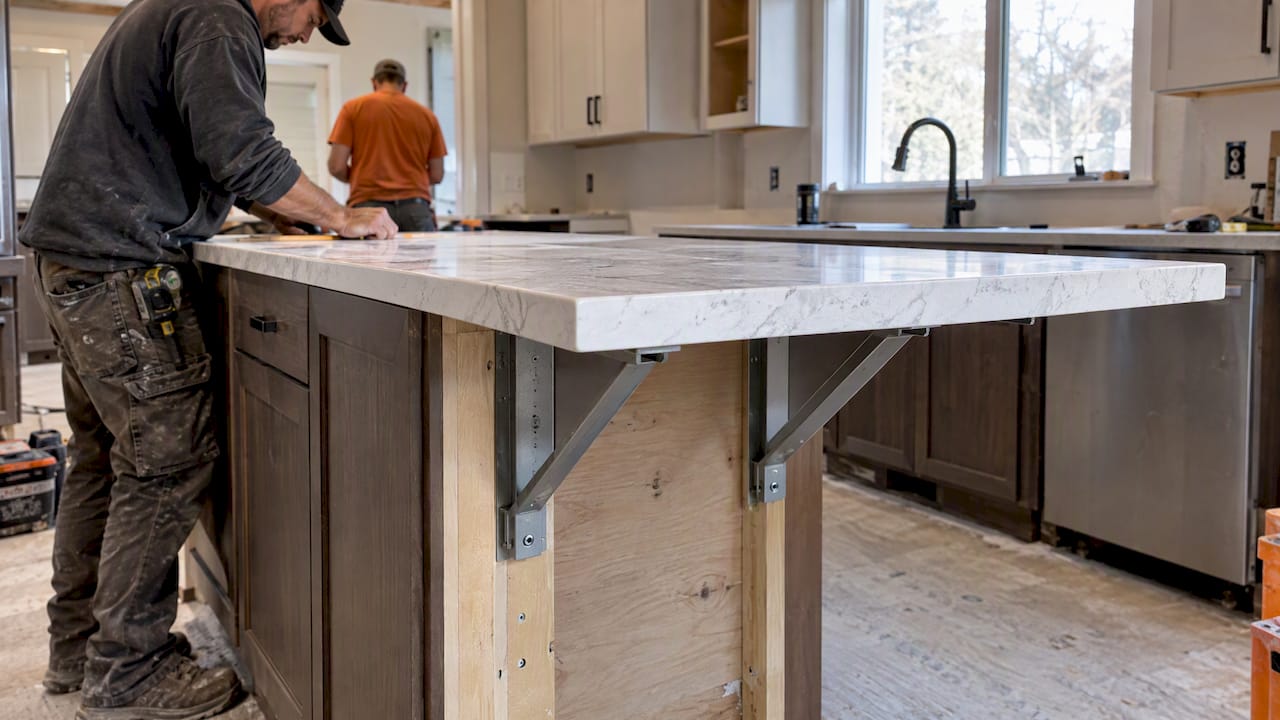
A widely cited rule of thumb, sometimes called the one-third rule, says no more than a third of total counter depth should go unsupported, though bracket and corbel guidance notes that manufacturer limits always take precedence over the rule of thumb. Corbels should be lagged into real framing, not just the cabinet skin, and spaced no more than about 36 inches apart. Heavily veined slabs need shorter spans than the chart suggests, since fissures running across the cantilever cut flexural strength well below a clean slab’s rating.
How to measure and plan overhangs with your fabricator
Bring these numbers to your template appointment so the fabricator can price supports correctly the first time.
- Measure the overhang from the finished cabinet face, not the wall or the cabinet box.
- Note any applied molding, finished end panel, or appliance trim that reduces net knee room.
- Record the exact slab thickness and slab ID, and ask for the manufacturer’s written unsupported-span limit.
- Decide your target seating depth and stool type before templating, not after.
- Confirm bracket or corbel spacing and how they anchor into framing, in writing.
Choosing your appliances before you finalize cabinet layout avoids last-minute overhang surprises, a point covered in more detail on why appliances should come before cabinets. A slab’s thickness and finish also factor into which countertop material makes sense for your overhang goals in the first place.
Common problems and fixes: cracks, knee contact, and warranty issues
An overhang that was never engineered for its span shows warning signs early, and most of them are fixable if you catch them before the slab fails.
- Hairline cracks near the cabinet edge usually mean the span exceeded the material’s safe limit.
- Visible deflection or bounce under hand pressure signals missing or undersized support.
- Guests repeatedly hitting their knees means the seating overhang or counter height was miscalculated.
Fixes range from adding a hidden steel rod or bracket retroactively to installing a properly lagged corbel or apron, or simply swapping to shallower stools. For cabinet door measurement issues that affect how much face clearance you actually have, confirm finished dimensions before blaming the overhang.
Pro Tip: Get the overhang distance and support method written into your contract, not just verbally confirmed, since unwritten specs are the first thing a warranty claim gets denied over.
Design and build checklist from a remodeler’s perspective
Sequencing matters more than most homeowners expect. Choosing appliances before finalizing cabinet layout avoids the scramble of resizing an overhang around a refrigerator panel that arrives wider than planned, a problem detailed in cabinetmaking guidance on appliance-facing details.
On a design and build project, a dedicated Lead Carpenter typically verifies that corbels are anchored into real framing, that the slab has adequate bearing at the cabinet edge, and that supports were installed to the specification agreed on paper, not a field improvisation. A Work Clean System style approach, which keeps dust and debris controlled during framing and templating, also makes dry-fit checks easier to do properly before final templating locks in the overhang for good.
Pick comfort, then engineer the support
If you have the floor space, aim for the 15 inch seating depth at counter height rather than defaulting to 12 inches just because it is the smaller number. Comfort should drive the dimension first. Then let the fabricator engineer the support, rod, bracket, or corbel, to match that span. Planning the support early costs far less than retrofitting one after a crack shows up and a warranty claim gets denied.
— MediaBeast
How Bath & Kitchen Gallery plans overhangs that hold up
Getting the overhang right on paper is one thing. Getting it built to match, with the correct substrate and anchoring hidden underneath, is where a lot of kitchen projects go sideways. Design and construction are coordinated together, with a dedicated Lead Carpenter assigned to the project to coordinate slab support with cabinet framing before templating.

- Design and construction are coordinated to keep overhang specs consistent between trades.
- A Lead Carpenter typically follows the project from framing through final slab installation.
- Up-front pricing aims to ensure support requirements are priced before templating, to avoid surprises later.
If you are planning a kitchen remodel and want the island seating depth and support specs settled before the slab gets cut, start with our kitchen remodel costs page to see what a project like yours typically runs.
FAQ
Is a 2 inch countertop overhang too much?
A 2 inch overhang is larger than the typical 1 to 1.5 inch perimeter range and often exceeds AWI’s acceptable front overhang guidance of roughly 0.5 to 1.25 inches on cabinetwork, according to the Architectural Woodwork Institute. It is not automatically unsafe, but it is worth confirming with your fabricator that the cabinet face and door clearance still work at that depth.
Is a 12 inch overhang enough for island seating?
Twelve inches is the commonly cited minimum for knee clearance and works at 42 inch bar height, but many adults find it tight at standard 36 inch counter height, according to NKBA-based seating guidance. Fifteen inches is generally recommended for comfortable seating when the layout allows the extra depth.
How big can a countertop overhang be without support?
Unsupported spans depend heavily on material and thickness: 2 cm stone typically allows around 6 inches unsupported, while 3 cm stone often allows 10 to 12 inches, according to fabrication guidance on core materials. Many quartz manufacturers set tighter limits, often 8 to 12 inches, and exceeding them can void the warranty.
Is 8 inches enough for an island overhang?
Eight inches clears the one-third rule of thumb for most standard counter depths and sits within common unsupported limits for 3 cm stone, per bracket and corbel guidance. It falls short of the 12 to 15 inch range recommended for comfortable seating, so it works better as a decorative or spill-clearance overhang than a seating depth.
Sources
These standards and fabrication resources back the numbers used throughout this guide. The Architectural Woodwork Institute sets cabinetwork overhang tolerances and suspended span limits. NKBA-based seating guidance covers ergonomic seating depths. SlabWise and DynamicStoneTools detail unsupported stone spans and reinforcement methods. For broader island layout planning, see this kitchen island dimensions guide.
- 3.3 Structural – Architectural Woodwork Institute
- Gardenspace
- What core materials are used under stone countertop overhangs | SlabWise
- Countertop overhangs: Support brackets & corbels guide – DynamicStoneTools