
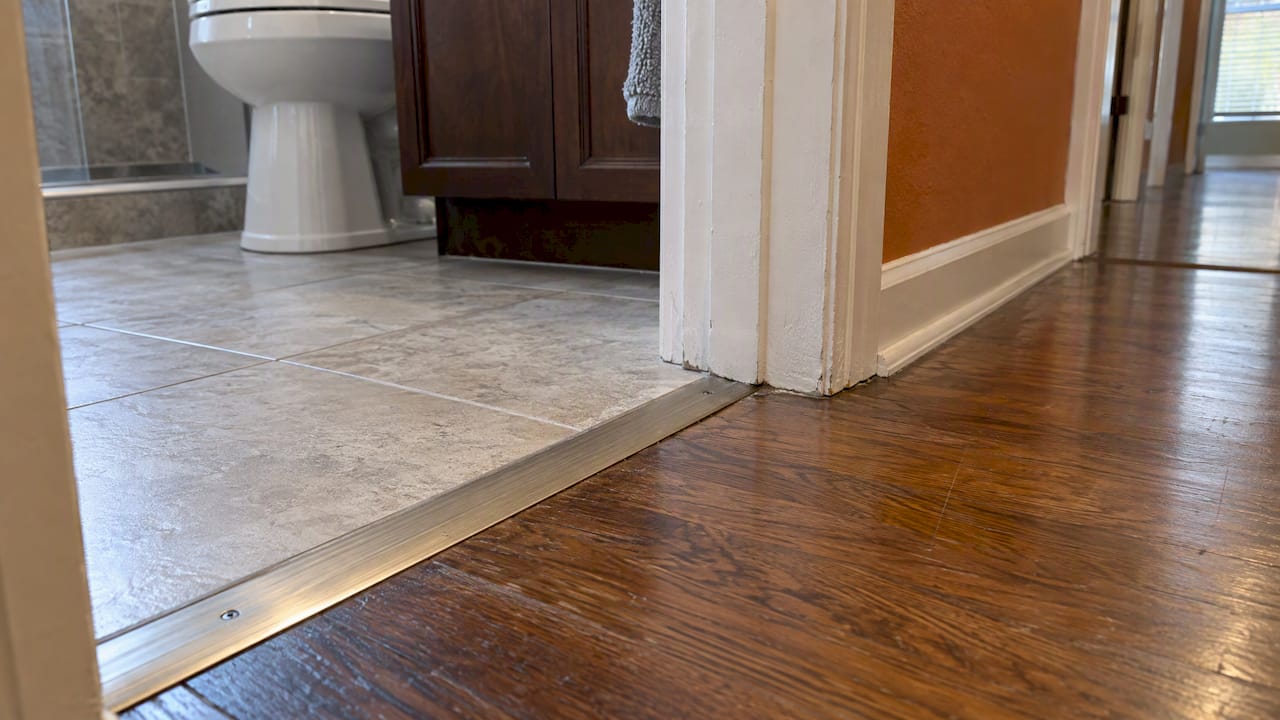
The right floor transition between rooms depends on two things: the height difference between the two floors and whether either floor is a floating floor. Measure the finished height of both surfaces, pick the profile that matches the gap, and center it under the closed door so neither room sees the other floor. The details below cover how to do each of those steps and where a flush transition beats a strip.
TL;DR
- The piece on the floor between rooms is a transition strip, also called a threshold. The profile you need is set by the height gap, not by style.
- Use a T-molding for floors at the same height, a reducer when one floor is lower, an end cap against a vertical surface, and a carpet strip for carpet-to-hard transitions.
- Never fasten a strip to both sides of a floating floor. Anchor it to the subfloor or to the fixed floor only.
- A level change over 1/4 inch is a trip risk. Under the ADA standards, changes between 1/4 and 1/2 inch need a bevel, and anything higher needs a ramp.
- The cleanest transition is planned before the floors go in, by matching the subfloor heights.
Table of Contents
- What the strip between rooms is called
- Choosing the profile by height gap
- Safety and accessibility limits
- Where the strip goes in a doorway
- Tile to wood transitions
- Floating floors: the rule that prevents buckling
- Open-concept layouts: fewer strips, better breaks
- What to use instead of a transition strip
- Perspective: why we settle transitions before the floor goes down
- Planning transitions in a bathroom or kitchen remodel
- Working with us on your remodel
- FAQ
- Sources
What the strip between rooms is called
People search for this under many names: threshold, transition strip, transition molding, doorway divider. They all describe the same job. The piece bridges two floor surfaces, covers the gap left for expansion and protects the raw edge of the material. According to a flooring guide from MF Interiors, the profile is chosen by the height and material change, and that is the right way to think about it.
The transition is a mechanical part first and a design detail second. Flooring professionals quoted in the same guide say the most common homeowner mistake is choosing on looks alone. A strip that is the wrong profile for the gap leaves a lip, rattles, or lets a floating floor buckle.
Choosing the profile by height gap
Start with a tape measure, not a catalog. Measure the finished height of each floor, including underlayment, padding, mortar bed and any plywood. Then match the gap to a profile.
| Situation | Profile | What it does |
|---|---|---|
| Two hard floors at the same height | T-molding | Sits over the expansion gap and covers both edges |
| One floor lower than the other | Reducer | Slopes down from the higher floor to the lower one |
| Floor ends against a vertical surface such as a sliding door track or fireplace hearth | End cap or threshold | Finishes the edge and covers the gap |
| Carpet meeting a hard floor | Carpet-to-hard strip | Grips the carpet edge and caps the hard edge |
Those four profiles match the breakdown in the MF Interiors guide. A hardwood transition guide from Woodworking Advisor adds a useful rule of thumb: a reducer suits a gap of roughly 1/4 to 1/2 inch, and a bigger difference calls for a leveling fix instead of a bulky strip.
When the gap is larger than a reducer can handle
A steep reducer is a stub toe waiting to happen. If you are looking at a gap beyond about 1/2 inch, stop shopping for trim and look at the floor. Options include adding plywood or leveling compound under the lower floor, or thinning the higher side where that is practical. Which one is possible depends on your subfloor and what lies beneath it, so have a contractor check before you cut anything.
Safety and accessibility limits
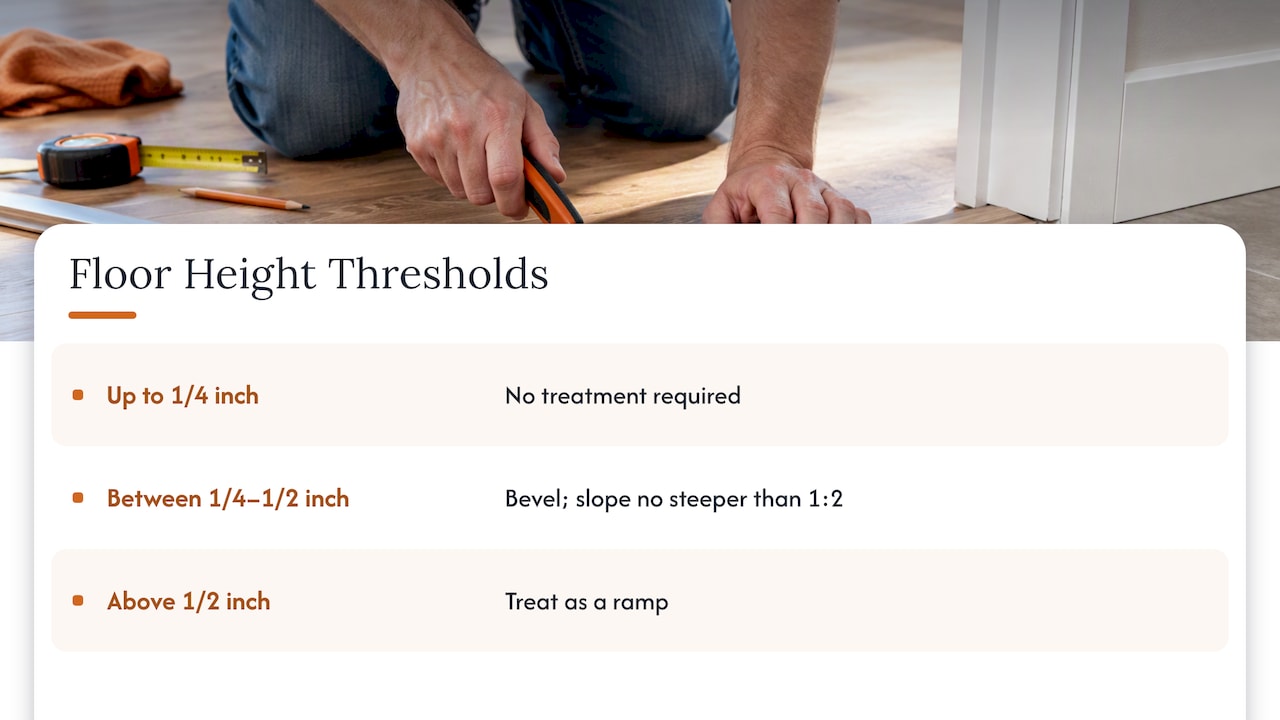
Even if nobody in your home uses a wheelchair or walker, the federal accessibility numbers are a handy benchmark for trip safety. The U.S. Access Board’s guidance on floor and ground surfaces states that vertical changes up to 1/4 inch are permitted without treatment. Changes between 1/4 inch and 1/2 inch must be beveled with a slope no steeper than 1:2. Anything above 1/2 inch must be treated as a ramp.
The ADA standards apply to public and commercial facilities, not to a private house, so they are not a legal requirement for your hallway. They are still a sensible target, especially if you are planning to age in place, have small children, or expect guests who use mobility aids. If you are remodeling a bathroom, a low or barrier-free threshold is worth planning from the start.
Where the strip goes in a doorway
With a door in the opening, the strip belongs centered under the closed door. When the door is shut, each room then shows only its own floor. The MF Interiors guide gives this as its quick answer, and a homeowner guide on tile-to-wood doorways makes the same point: you want to see only the flooring of the room you are standing in.
Two practical checks save you trouble:
- Door clearance. A raised strip can catch the bottom of the door. Measure the gap under the closed door first. The MF Interiors guide suggests leaving about 5/8 to 3/4 inch of clearance so the finished strip fits without binding. Trimming a door after the fact is awkward and visible.
- A clean channel. Contractors cited by Houzz describe placing a dummy piece of scrap baseboard or plywood, cut to the size of the planned strip, in the doorway while the floor goes in. It keeps thinset, grout and adhesive out of the channel, so the final strip goes in faster and cleaner.
Tile to wood transitions
This is the pairing most homeowners ask about, because tile and wood are rarely the same thickness. A tile floor on a mortar or backer board can sit higher than a hardwood or engineered plank floor, or the reverse.
Your options, from most to least seamless:
- Flush transition. The two surfaces sit at the same height with a small gap or a thin metal or wood profile between them. It gives the cleanest look but has to be planned in advance.
- T-molding. Works when both surfaces are already at nearly the same height.
- Reducer. Handles a modest step and is the standard fix when the heights differ.
- Thin metal edge profile. A slim metal strip protects the tile edge and reads as a fine line rather than a wide band. It suits modern spaces.
A comparison table from Flooring Clarity lines up the same logic: reducer strips for different heights, flush transitions for the same height.
Planning a flush tile-to-wood floor
Specialists often recommend aiming for a flush finish whenever you can. That can be engineered early by changing the subfloor thickness, adding or removing layers of plywood so tile and hardwood end up level. The Houzz piece on connecting tile and hardwood shows a bathroom with exactly this flush transition. The catch: you have to decide before the first floor is laid. Once both are down, the only remaining fixes are trim or a teardown.
Bathroom doorways and slip resistance
The tile side of a bathroom threshold sees water. A glossy or sealed tile that is too slick can be a hazard right at the doorway, where wet feet meet a step. If you are choosing tile finish and sealer for that zone, read up on fixes for slippery sealed tile before the floor is done. If you are weighing tile choices for a bath, our own pages on the best flooring for a beachy bathroom and whether you can tile over existing tile cover the surface itself. Tiling over old tile raises the floor, and that changes your transition height.
Floating floors: the rule that prevents buckling
Many luxury vinyl plank, laminate and engineered wood products are floating floors. They are not glued to the subfloor and need room to expand and contract. The rule: the transition strip must never be fastened to both sides of a floating floor. Pinning it to both sides locks the floor in place and can lead to buckling, cupping or split seams, especially as humidity changes through the seasons. Fasten the strip to the subfloor or to the fixed floor only, and let the floating floor slide under or against it. That guidance comes from the MF Interiors guide, and it is worth confirming against your plank maker’s installation instructions, since warranties often depend on them.
You may have heard of a “rule of 3” for flooring. There is no single standard formula by that name, but the guide describes three checks professionals consistently make:
- Measure the height difference precisely, including underlayment.
- Leave the expansion gap the material needs.
- Secure the strip to the subfloor, not to the floating planks.
Open-concept layouts: fewer strips, better breaks
In an open plan there is no door to hide the seam, so a strip running across the middle of the room can look like a repair. Contractors in the MF Interiors guide suggest placing the change at a natural visual break instead: a cased opening, the line of the kitchen cabinetry, or the edge of a built-in. The seam then reads as intentional.
A few ways to zone an open space without a visible strip:
- End the kitchen tile at the edge of the cabinets or island and start the wood on the dining side.
- Use one continuous floor through the whole public area and save the material change for bathrooms and bedrooms.
- Anchor each zone with an area rug. If you want ideas for sizing, a guide to entryway rug ideas shows how a rug can define a threshold area.
If you are considering opening up walls, our pages on open-concept design for Tampa homes and an open-concept kitchen remodel in Cheval show how the floor plan and flooring decisions go together.
What to use instead of a transition strip
A strip is not the only answer. Alternatives include:
- Flush joint with a grout or caulk line, when both floors are at the same height and the materials are stable.
- A thin metal profile that finishes the tile edge and acts as a hairline divider.
- Continuing the same floor through the opening.
- Subfloor leveling so the two surfaces meet at one height.
The right one depends on how much the two floors will move. Tile and a floating floor move differently, and a rigid joint between them will crack. If either is a floating floor, keep a flexible gap or a profile designed for movement.
Perspective: why we settle transitions before the floor goes down
We design and build in-house, and the floor transition is a good example of why that matters. A threshold is where a design choice meets a construction reality. The tile picked in the showroom has a thickness, the underlayment has a thickness, and the existing floor in the next room has a height. If a designer picks the materials and a separate crew finds the mismatch on installation day, the fix is usually a bulky reducer and an unhappy homeowner.
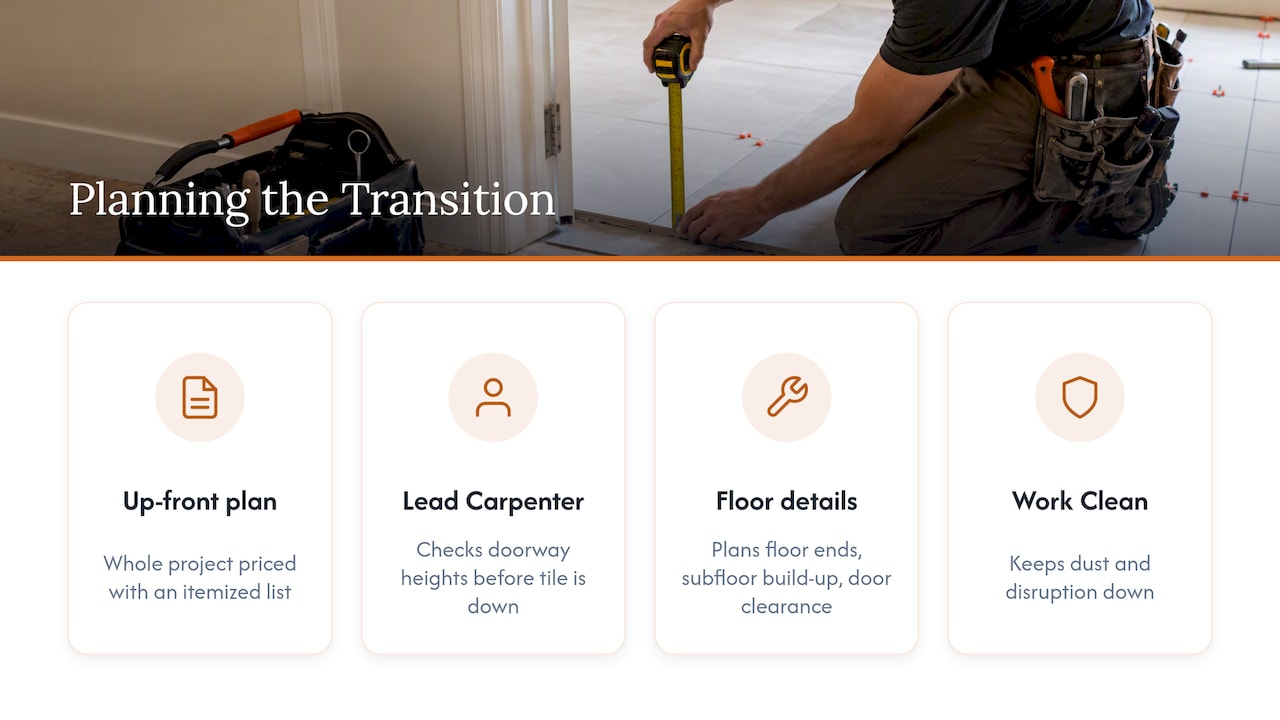
Our approach is to price and plan the whole project with an itemized, up-front list, and to give each job a dedicated Lead Carpenter. That person looks at the doorway heights in advance, not after the tile is down. In practice that means deciding where each floor ends, how thick the subfloor build-up needs to be, and how much clearance the door needs, before demolition. A flush transition is almost always a planning decision, not a trim decision.
We also work under our Work Clean System to keep dust and disruption down, which matters at doorways, because the threshold is the first place dust and thinset travel into the next room.
— MediaBeast
Planning transitions in a bathroom or kitchen remodel
Transitions are cheap to plan and expensive to fix. If a remodel is on your list, bring these to your first meeting with a contractor:
- Which doorways will have a material change, and which can keep one floor running through.
- The finished height of each new floor, including underlayment, versus the neighboring room.
- Door clearance at each opening.
- Whether any floor is floating, and where it will be anchored.
- Whether a curbless or low-threshold shower or bath entry is wanted.
For kitchens, our guides to perfect kitchen flooring and creative kitchen flooring can help you pick the material before you pick the strip. For baths, material selection for a bathroom remodel walks through the choices.
Working with us on your remodel
If you are redoing a bathroom or kitchen in the Tampa area, we handle the design and the construction together, so your floor heights and transitions are planned as part of one job. Our published price ranges include, for example, a Small 3-Fixture Bath with Shower at $22,100 to $30,000 and a Small U-Shaped Kitchen at $48,500 to $60,200. See the full ranges on our bathroom remodel cost page and kitchen remodel cost page, or start with our bathroom remodeling and kitchen remodeling services. If the flooring runs through several rooms, ask about whole home remodeling.
FAQ
What can I use instead of transition strips?
You can run one continuous floor through the opening, level the two floors to the same height and leave a narrow joint, or use a thin metal edge profile. The best option depends on whether either floor is floating and needs room to move. If you are unsure, ask a flooring installer to check your subfloor before you decide.
What is the thing on the floor between rooms called?
It is most often called a transition strip or a threshold. Specific names describe the shape: T-molding, reducer, end cap and carpet strip. Each is made for a different height or material change.
Where should a transition go in a doorway?
Center it under the closed door so the seam is hidden from both rooms. Check the clearance under the door first, since a taller strip can make the door bind.
How big a height difference is acceptable?
For trip safety, aim for the smallest step you can. The U.S. Access Board’s accessibility standards allow changes up to 1/4 inch without treatment and require a bevel up to 1/2 inch. Above that, a ramp is required. Those rules cover accessible routes in covered buildings, but they are a useful guide for a home.
Sources
- Flooring Transitions Between Rooms: Types, Where They Go and When You Need One (MF Interiors)
- Floor and Ground Surfaces (U.S. Access Board)
- Transition Time: How to Connect Tile and Hardwood Floors (Houzz)
- Hardwood Floor Transition Between Rooms (Woodworking Advisor)
- How to Transition From Tile to Hardwood Flooring (Flooring Clarity)
- Transitions From Tile to a Wood Floor in a Doorway (SFGate Home Guides)