
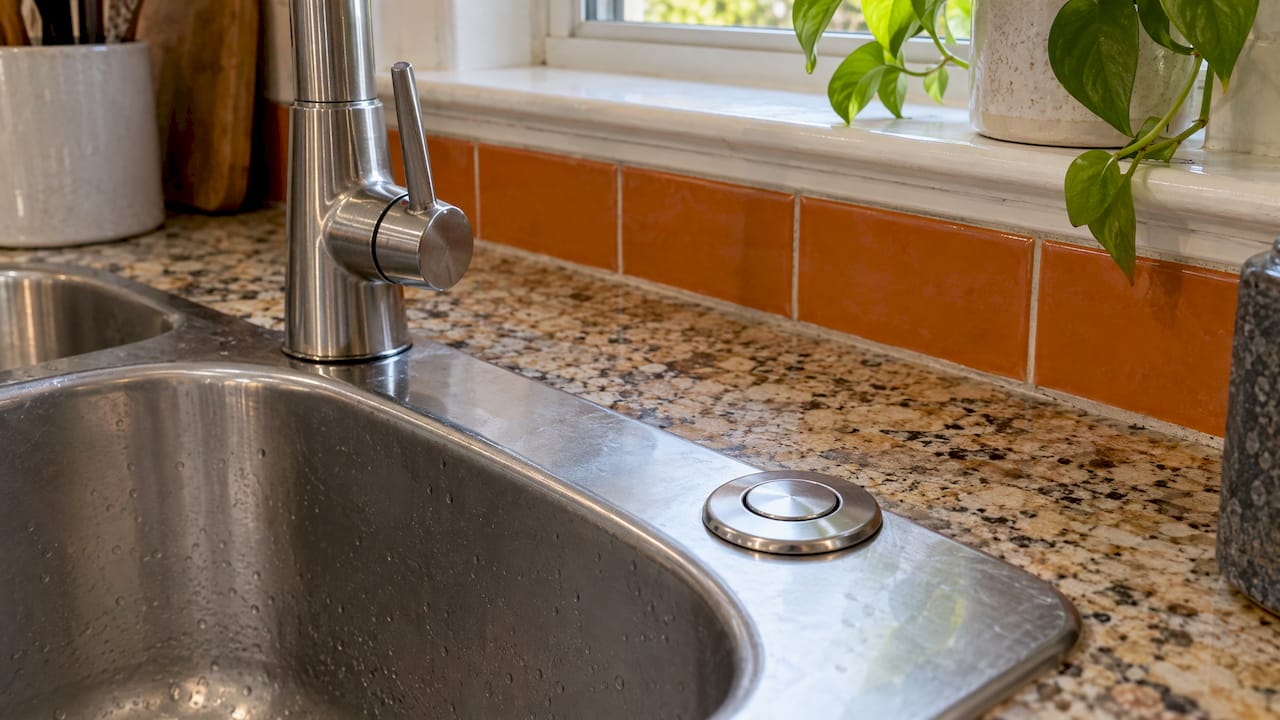
A garbage disposal air switch is a push button on your countertop or sink that turns the disposal on and off with a puff of air instead of an electrical signal. It suits kitchens where a wall switch is awkward, such as islands, and it is easiest to get right when you plan it with the sink, the countertop and the outlet before the work starts, not after. Below you will find how it works, what it needs, the hole size, the installation steps, what to do when it misbehaves, and why a remodel is the best time to add one.
TL;DR
- An air switch is a button that pushes air through a thin tube to a control unit under the sink. The control unit, not the button, switches the power.
- It works with continuous-feed disposals. Moen’s guide says those need either a wall switch or an air switch, and the controller and button are sold separately from the disposal.
- Plan for a 1-3/8 inch hole, a grounded 120-volt outlet under the sink, and a disposal rated at 1 horsepower or less for most kits.
- Disconnect power first, use GFCI protection, and bring in a licensed electrician for any outlet or wiring change.
- If you are remodeling the kitchen anyway, decide on the button location, finish and outlet during design, before the countertop is cut.
Table of Contents
- What a garbage disposal air switch is
- Why homeowners choose one
- Which disposals it works with
- What size hole does an air switch need?
- How to install a garbage disposal air switch
- Safe use day to day
- Why won’t my disposal turn off, or on, with the air switch?
- Can a garbage disposal work without a switch?
- The best time to add one: during a kitchen remodel
- Planning a kitchen with the details already decided
- FAQ
- Sources
What a garbage disposal air switch is
A standard disposal is turned on by a wall switch, often a few feet from the sink. An air switch replaces that switch with a small button mounted in the sink deck or countertop. Pressing it compresses a small bellows inside the button and sends a pulse of air down a tube to a control unit under the sink. That unit contains the pressure switch that actually turns the disposal on. Press again and it turns off.
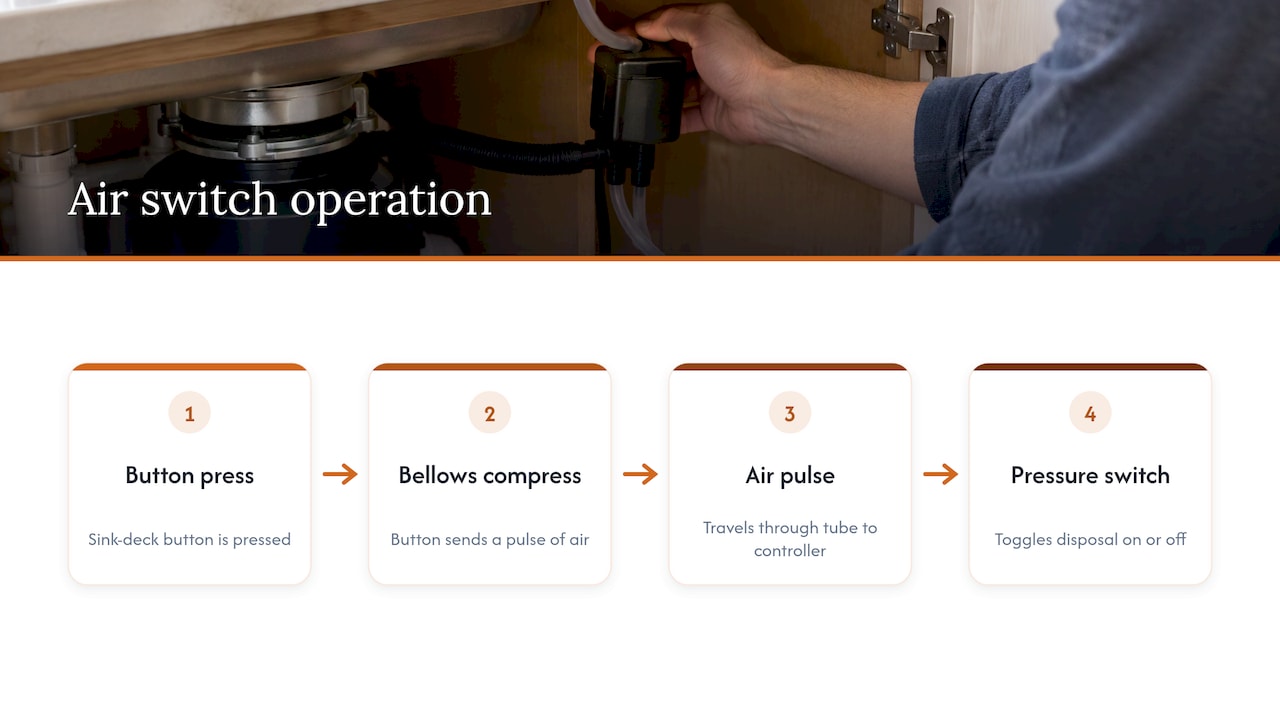
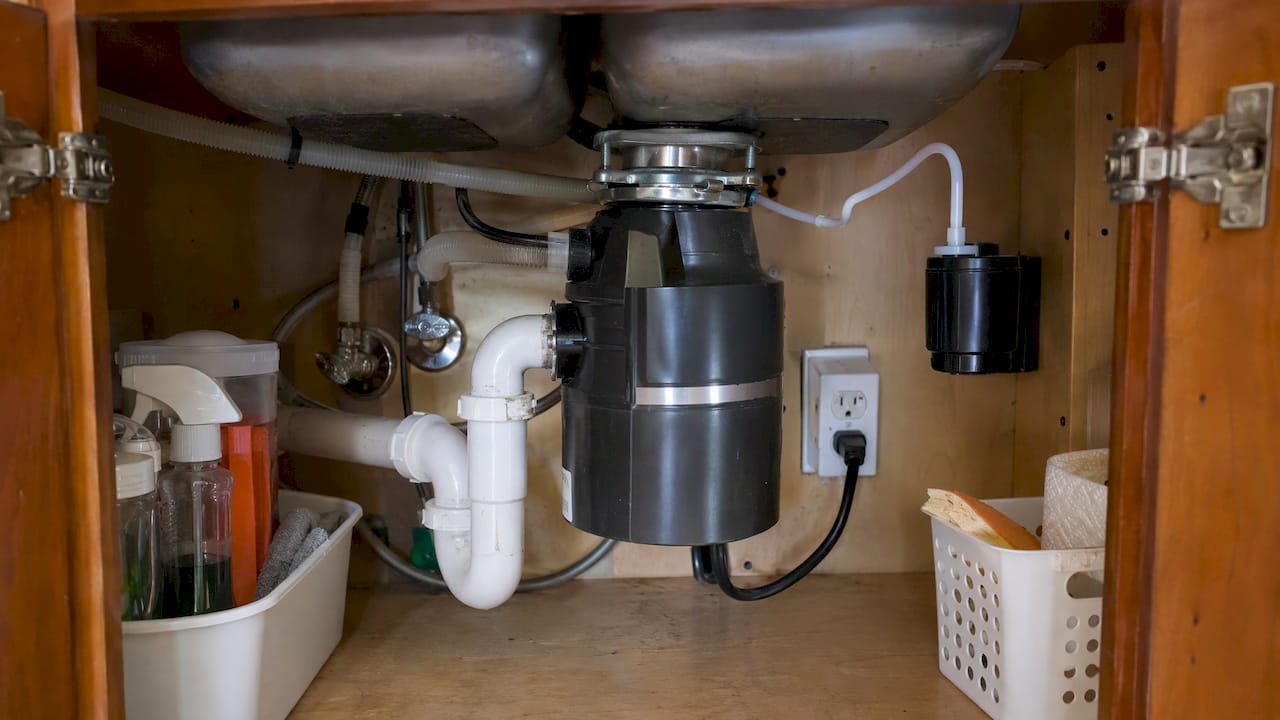
Two details trip people up. First, the button itself carries air, not electricity. Presair’s explanation notes that no line voltage is needed at the button and no compressor or air tank is involved. The button acts as a tiny manual air pump. Second, the rest of the system is still electrical. The control unit plugs into an outlet, and the disposal plugs into the control unit, so it has to be installed correctly like any other powered appliance.
Why homeowners choose one
The usual reasons are practical.
- Islands and peninsulas. If the sink sits in an island, there is no wall nearby for a switch. An air switch puts the control right where your hands are.
- Awkward wall switch placement. Many older kitchens have a disposal switch behind a corner, beside the stove or across the room. Moving it means opening a wall. An air switch avoids that.
- Clean look. A small button in brushed nickel, bronze or another finish disappears into the sink area. Kits come in several finishes, so it can match your faucet.
- Safer for damp hands. Because the button has no live electrical component, you are not touching a switch plate with wet fingers. Lew Electric’s instructions still warn against operating the button with wet hands, so treat that as a rule, not a loophole.
Moen’s guide frames the choice sensibly: consider an air switch when there is no wall switch for the disposal and you are using a continuous-feed model. It is the practical answer to a layout problem, not a requirement for every kitchen.
Which disposals it works with
Air switches are designed for continuous-feed disposals, the common type where you run the motor and then feed scraps in. Batch-feed disposals start when you twist a lid into place, so they do not use one.
Capacity matters too. Moen’s ARC-4200 controller, for example, is rated for disposers up to 120 volts and 12 amps, or 1 horsepower, and it comes with a button, 10 feet of 1/8 inch air tubing and the controller base. Lew Electric’s controller is likewise listed for disposals up to 1 horsepower. Check the horsepower on your disposal’s label before you buy a kit. Some disposals include an air switch in the box, so check before ordering a second one.
What to look at when choosing a kit
Five checks cover almost every purchase:
- Feed type. Continuous feed only.
- Amperage and horsepower rating. Match the controller to your disposal, usually 1 HP or less.
- Outlet count. Many controllers switch only one of their outlets. If you also want a dishwasher or instant hot water tap on the same box, read the specs.
- Hole size. See the next section.
- Finish. Pick one that matches the faucet and sink accessories.
If you are choosing finishes anyway, it helps to browse kitchen organizers and accessories while you plan the sink area, so the button, soap dispenser and under-sink storage work together.
What size hole does an air switch need?
Most US kits call for a 1-3/8 inch hole. Moen’s instructions specify 1-3/8 inches and tell you to tighten the plastic nut completely so the button seals. Lew Electric’s kit also uses a 1-3/8 inch hole and accommodates up to 1.5 inches. Hajoca’s guide for its air-actuated control likewise lists a 1-3/8 inch drilled or knocked-out hole.
Where the hole goes depends on what you have:
- Stainless sinks often have a spare knockout or an unused sprayer or soap dispenser hole you can reuse.
- Stone or solid-surface countertops need a hole drilled with the right bit. This is the reason to decide before the countertop is fabricated: a hole cut in the shop is cleaner and lower risk than one drilled in a finished stone slab in your kitchen.
- Thick countertops may need a longer-body button so the nut can reach the underside. Check the button length against your countertop thickness.
The tube length matters as well. Hajoca’s control lets the button sit up to 15 feet from the unit, with 6 feet of tubing supplied, while Moen’s kit includes 10 feet. Measure the run from the button to the control location before you buy.
How to install a garbage disposal air switch
The install is manageable for a confident DIYer, but the electrical part carries real risk. Lew Electric’s instructions call for disconnecting all power first and say the controller should be installed by a licensed, insured and bonded electrical contractor. Hajoca’s guide also says controls should be installed by a licensed electrician following state, national and local code. Read your kit’s instructions, and treat the steps below as the overview.
Before you start
Turn off the breaker for the sink circuit and confirm the disposal is dead. Clear the cabinet under the sink. Confirm there is a grounded 120-volt outlet within reach of the control unit. Many older kitchens have the disposal wired to a wall switch with no plug-in outlet under the sink. In that case the outlet needs to be added or the wiring converted, and that is electrician work.
The steps
- Prepare the hole. Use an existing 1-3/8 inch opening or make one, as covered above.
- Mount the button. Drop it through the hole, add the washer or seal as the kit directs, and hand-tighten the plastic nut from below until it is secure and sealed.
- Run the tube. Connect the tubing to the bottom of the button and route it to the control unit without kinks or sharp bends. A pinched tube is the most common reason a button fails to respond.
- Connect the tube to the controller. Push it onto the fitting. Cut it to length if there is excess, but leave enough slack to avoid tension.
- Plug in the controller. Use an outlet protected by a GFCI, which is a device that cuts power quickly if it detects a ground fault. Lew Electric says to use an approved GFCI receptacle or a standard receptacle on a GFCI circuit. Kitchen outlets near sinks usually already have this protection, and you should keep it in place.
- Plug in the disposal. Connect it to the controller’s switched outlet, following the manufacturer’s electrical instructions.
- Restore power and test. Press the button. The disposal should start. Press again, and it should stop. Run water first, as you normally would when using the disposal.
Hajoca’s guide adds that where a GFCI is part of the unit, it should be tested monthly with its test button to confirm it cuts power and the reset button pops out. That is a good habit for any GFCI near a sink.
Where it goes wrong
The usual mistakes are a loose nut that lets the button wobble, a tube kinked in a tight cabinet, plugging the disposal into the unswitched outlet on the controller, and skipping GFCI protection. Another common problem is discovering at the last step that the disposal is hardwired and there is no outlet. Check that before you buy anything.
Safe use day to day
An air switch makes starting the disposal easy, which is exactly why it needs a few house rules.
- Never reach into the disposal. Eastside Electrical’s guidance is that neither a wall switch nor an air switch makes reaching into a disposal safe. Turn the power off at the breaker or unplug the unit before clearing a jam, and use tongs.
- Mind children. A button within reach can start the disposal, so adults should supervise kids in the kitchen. A countertop button placed near the back of the sink deck helps.
- Dry hands. Follow the kit’s warning not to operate the button with wet hands.
- Keep hands and utensils clear. With a continuous-feed disposal the opening has no cover while it runs, so feed scraps in with the motor running and keep fingers out.
- Do not ignore warning signs. A disposal that hums without grinding, repeatedly trips a breaker or GFCI, or will not stop needs diagnosis before more use, according to Eastside Electrical.
Why won’t my disposal turn off, or on, with the air switch?
Think of the system as a chain: button, tube, controller, outlet, disposal. Work through it in order, with power off whenever you touch anything.
Nothing happens when you press the button.
- Look for a kinked, cracked or disconnected tube. Reconnect it or replace the tubing.
- Confirm the disposal is plugged into the switched outlet on the controller.
- Check that the controller has power and the GFCI has not tripped.
- Press the small red reset button on the bottom of the disposal. It trips when the motor overheats or jams.
The button feels weak or works only sometimes. A worn button diaphragm or a small leak in the tube can reduce the air pulse. Replace the button or tubing.
The disposal will not turn off. Press the button a few times to see if the problem is a sticking control. If it persists, unplug the unit or switch off the breaker, then replace the controller or button. A disposal that will not stop should not be left to run, and one that keeps misbehaving is a job for a licensed electrician.
The disposal hums but does not spin. That is usually a jam, not a switch problem. With power off, check that the turntable moves freely, then use the reset button.
Can a garbage disposal work without a switch?
No. A continuous-feed disposal needs some way to turn it on and off. Moen states it must use either a wall switch or an air switch. If you have an air switch you no longer want, some manufacturers let you disable it and go back to a wall switch. InSinkErator’s manual, for instance, describes removing the bellows and tubing for its own models. Follow your own model’s manual.
The best time to add one: during a kitchen remodel
Adding an air switch to a finished kitchen means drilling through a countertop that is already installed and sorting out an outlet inside a full cabinet. During a remodel, the same decision costs almost nothing extra because it is part of choices you are already making:
- Sink and island layout. If the sink goes in an island, you know from the start there is no wall switch, so the air switch and its outlet are planned in.
- Countertop cutouts. The button hole sits alongside the faucet, soap dispenser and any other holes, and a shop-cut hole beats a drilled one on stone.
- Cabinet interior. The controller, outlet and tube run need space. Under-sink cabinets get crowded fast, so it pays to place them deliberately.
- Finish matching. The button finish can be picked with the faucet and hardware, not after.
If you want to see how appliance choices fit into a bigger plan, our guide on appliances you should upgrade in a kitchen remodel is a good place to start, and our piece on designing a kitchen that works hard covers how layout decisions like the sink location affect daily use.
How we think about it
A garbage disposal switch is a small detail that shows whether a remodel was planned or improvised. When the person who designs your kitchen is also the person who builds it, the questions get asked at the right time: where does the sink go, where does the outlet go, where does the button sit, how thick is the countertop. We design and build in-house, so those answers live in one plan instead of being passed between separate parties.
Every project has a dedicated Lead Carpenter, which means one person on site who knows the plan, including the small items that are easy to miss. Our up-front pricing comes with detailed item lists, so you can see what is included before work starts. And our Work Clean System keeps dust and disruption down while the work is happening, which matters in a kitchen you are still trying to live in.
Our advice is simple: if you are remodeling, tell us you want an air switch while the kitchen is still on paper.
MediaBeast
Planning a kitchen with the details already decided
If you are replacing your countertops, moving a sink or building out an island, the air switch belongs in the plan from the start. Bath & Kitchen Gallery handles both design and construction for kitchens and bathrooms in the Tampa area, with a local showroom for material selection, a dedicated Lead Carpenter on each project and up-front pricing.
Our published kitchen remodel ranges run from $41,200 to $93,600 depending on layout and scope, and you can see each configuration on our kitchen remodel costs page. When you are ready to talk about your own kitchen, start with our kitchen remodeling page.
FAQ
Does an air switch need electricity?
The button does not. It only moves air through the tube. The control unit under the sink does need power, because it plugs into an outlet and switches power to the disposal. Install it with GFCI protection and follow the kit’s electrical instructions.
Can I install an air switch on any garbage disposal?
Only on continuous-feed disposals, and most kits are limited to disposals up to 1 horsepower and 120 volts. Check the label on your disposal and the rating on the controller before buying. If the disposal is hardwired with no plug, an electrician needs to add an outlet first.
How far from the sink can the button be?
It depends on the kit and its tubing. Hajoca’s control allows the button up to 15 feet from the unit, with 6 feet of tubing supplied, and Moen’s kit includes 10 feet. In practice the button sits at the sink or on the countertop next to it, so measure the tube path through the cabinet.
Why won’t my disposal turn off with the air switch?
The cause is usually a sticking controller or button. Press the button a few times, then switch off power and check the tube connections. If it still will not stop, replace the controller or button and have a licensed electrician look at it. Do not keep running a disposal that will not shut off.
Sources
- Moen air switch controller instruction sheet
- Moen: Choosing a garbage disposal
- Lew Electric air switch installation instruction
- Hajoca air-actuated control installation guide
- Eastside Electrical: air switch vs. batch feed
- InSinkErator installation manual