
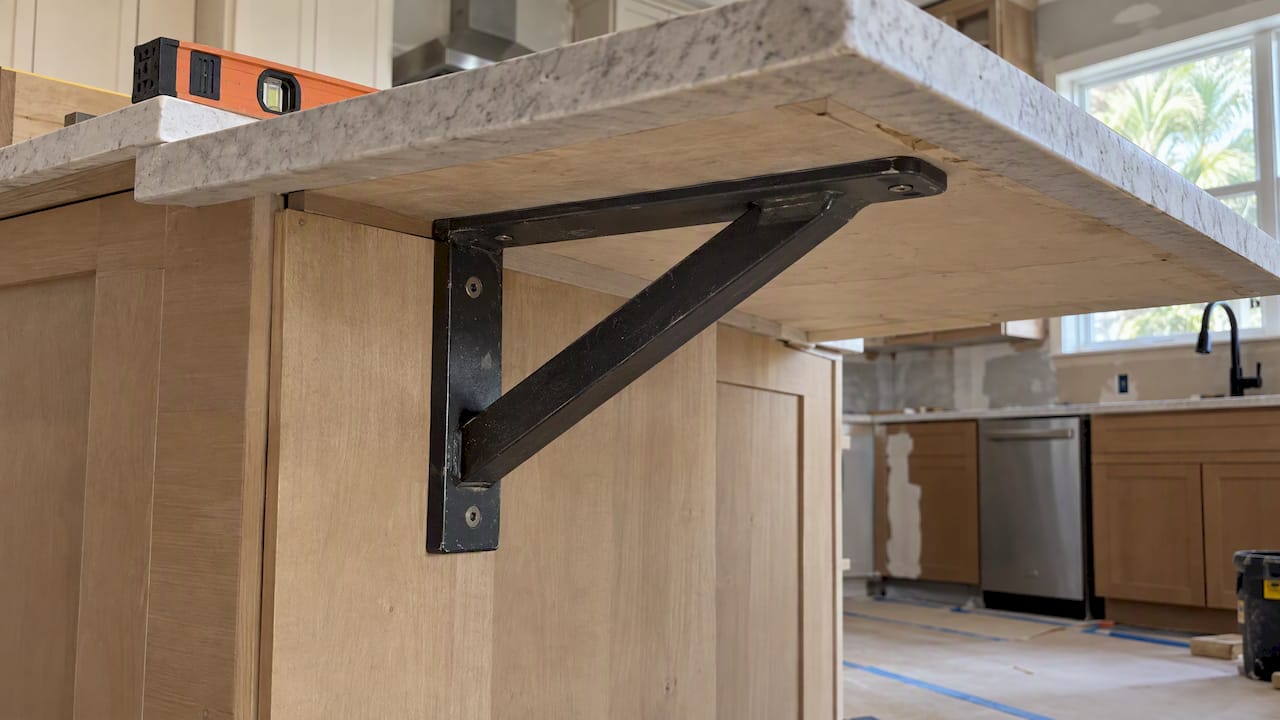
Countertop support brackets keep an overhanging slab from cracking or tipping under weight. You need them when the overhang goes past what your material can carry on its own. For seating at a kitchen island, that usually means anything beyond roughly 8 to 10 inches. Hidden steel brackets, visible corbels and legs are the three main ways to do it. The right one depends on your stone or surface, the overhang depth, any cutouts and what the brackets bolt to.
Below, we walk through how to size an overhang, which bracket type fits which job, how to space and install brackets, and what to check before anyone drills into your cabinets.
TL;DR
- An overhang is the distance the top extends past the cabinet face. The usual design rule is no more than 30% of the countertop’s depth, and seating overhangs beyond 8 to 10 inches need extra bracing.
- Safe unsupported distance depends on the material and thickness. Always check the manufacturer’s installation guide for your surface.
- Hidden steel brackets keep knee space clear. Corbels and legs make the support part of the design.
- A bracket’s load rating only applies if it is bolted into solid framing, spaced correctly and loaded evenly. Drywall and thin cabinet faces do not count.
- Sinks and cooktops cut into an overhang weaken it. Plan support before the slab is fabricated, not after.
Table of Contents
- What an overhang is and when it needs support
- How far can a countertop overhang without brackets?
- Types of countertop support brackets
- Choosing bracket size, spacing and load rating
- What to check before you buy brackets
- How hidden brackets get installed
- Can you add support to an existing countertop?
- Our perspective
- Planning an island or kitchen with proper support
- FAQ
- Sources
What an overhang is and when it needs support
The overhang is the part of the countertop that projects beyond the front of the base cabinets. On a standard kitchen run it is about an inch or so, enough to keep drips off the doors. On an island or peninsula with stools, it grows to give knees somewhere to go.
The Spruce puts the general design guide at no more than 30% of the countertop’s depth, with seating overhangs past 8 to 10 inches needing additional bracing. That is a comfort-and-structure rule of thumb, not a material rating. The actual limit comes from what the slab is made of.
We cover comfortable seating dimensions in our guide to countertop overhang size, and clearances around an island in our island sizing checklist. This article stays on the structure: what holds the overhang up.
How far can a countertop overhang without brackets?
There is no single number. Each manufacturer publishes its own limits for its own product, and they differ a lot by thickness. A few published examples show the spread:
| Material | Published unsupported overhang | Source |
|---|---|---|
| 13 mm Corian | Up to 6 in. needs no extra support; 6 to 12 in. needs plywood underlayment or brackets; 12 to 18 in. needs both; beyond 18 in. needs legs or columns | Corian technical drawing |
| 12 mm Dekton (island, no cutouts) | Generally up to 12 in. | Cosentino installation manual |
| 20 mm Dekton (island, no cutouts) | Generally up to 24 in., subject to the manual’s support dimensions | Cosentino installation manual |
| 12 mm porcelain slab with mesh backing | Maximum about 9.8 in. | SapienStone overhang guidance |
| 20 mm porcelain slab with mesh backing | Maximum about 13.8 in. | SapienStone overhang guidance |
Notice what the table says: a 12-inch overhang is fine for one product and needs hardware on another. Thinner material, natural stone with veining or fissures, and seamed slabs all need more help. In Corian’s guidance, a seamed overhang must be supported regardless of depth.
A practical reading for homeowners: if you want a 12-inch knee space for stools, assume you need brackets unless your fabricator confirms in writing that your specific slab and thickness can go without. Our note on 2 cm vs. 3 cm slabs explains why thickness changes both the price and the support plan.
Cutouts and corners change the math
A sink or cooktop opening removes material right where the stone is already working hardest. SapienStone’s guidance says the supported section should be at least as deep as the overhanging section, and the outer edge should sit at least 4 inches from a cutout. Larger overhangs need additional support on top of that. Cosentino adds that large cooktops and sinks over 24 inches need support bars anchored directly to the cabinets, and L-shaped tops need continuous support through the corner.
Inside corners where two overhangs meet need a second look. Federal Brace points out that two 10-inch side overhangs create roughly a 14-inch diagonal projection at the corner, which can need a bracket even when each side looks acceptable on its own.
Types of countertop support brackets
Hidden steel brackets
Hidden brackets are flat or L-shaped steel pieces that sit inside the cabinet, a pony wall or a recessed channel under the stone. They are what most people mean when they search for hidden countertop brackets: you get the support without anything showing below the edge. Federal Brace describes them as metal supports that hold overhangs and bars without being visible, commonly inside pony walls and cabinets.
There are two common forms:
- Flat island brackets are set into a channel cut in the cabinet, so the top of the bracket sits flush under the slab. Iron Supports describes solid steel brackets 1/2 inch thick and 2.5 inches wide, from 16 to 44 inches long, typically spaced 18 to 24 inches apart.
- L brackets bolt to a vertical face, such as a knee wall or pony wall, with the horizontal leg running under the stone. These suit raised bars and walls at the end of a run.
The tradeoff: hidden brackets only work when there is something solid to attach to, and they need to be planned before the countertop goes on.
Corbels and decorative supports
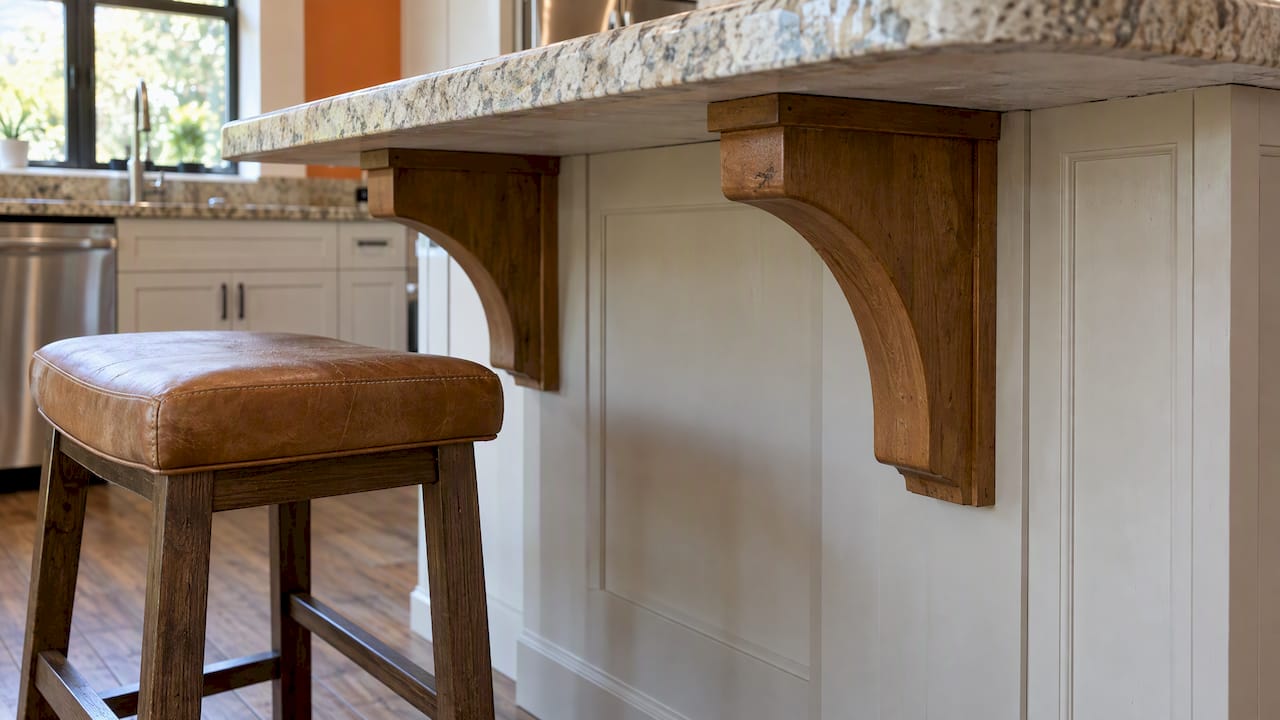
Corbels are visible supports, most often wood, that frame the overhang. Federal Brace’s view is that hidden brackets preserve knee space and a floating look, while corbels make the support part of the design. Corbels suit traditional and transitional kitchens. They do take up knee room, so check how they sit relative to your stool spacing.
Legs, posts and panel returns
When an overhang runs past what brackets can reasonably handle, as in Corian’s guidance beyond 18 inches, legs or columns take over. A slim steel leg or a paneled end can also read as intentional design on a large island.
Choosing bracket size, spacing and load rating
Three decisions matter: how long the bracket is, how many you need, and whether the structure behind it can carry the rating.
Length. Outwater’s technical guidance says supports should reach to within 4 inches of the countertop edge, and it warns that unsupported overhangs past 4 inches can fracture under point loads. Practically, that means the bracket needs to cover the overhang plus the depth of whatever it sits on, then stop short of the edge.
Count and spacing. Iron Supports specifies 18 to 24 inches between hidden island brackets and advises no more than 24 inches on center when in doubt. For an island 6 feet wide, that works out to at least three or four brackets, with the end ones set in from the edges, not at them. Heavier stone or thinner material means closer spacing.
Load rating. Manufacturer ratings vary by product:
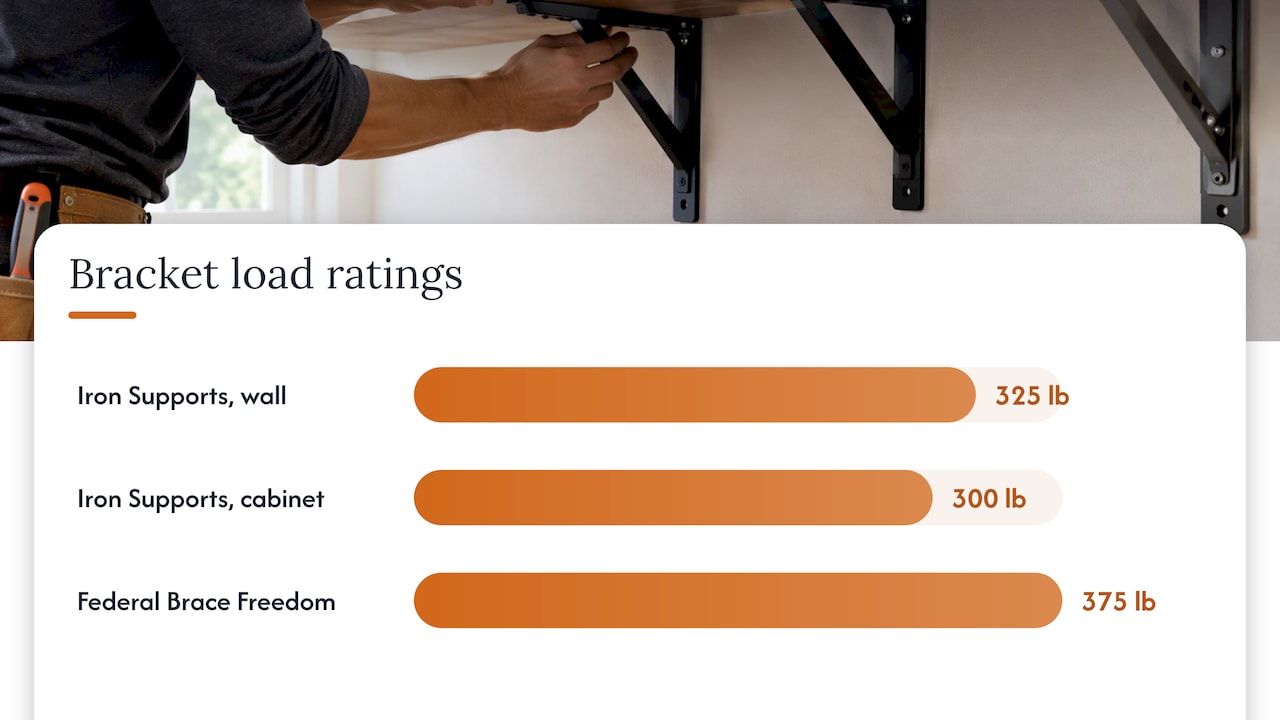
- Iron Supports rates its hidden granite L bracket at 325 pounds per bracket on knee or pony walls and 300 pounds on cabinet bases, spaced 16 to 24 inches on center and loaded evenly.
- Federal Brace’s Freedom bracket comes in 8 to 20 inch sizes and is rated at 375 pounds per bracket when installed per its guidelines.
Those numbers come with conditions. The ratings assume framing, anchorage, spacing, level bearing and evenly spread loads. A person sitting on one corner of the overhang, or a heavy appliance at one end, is not an even load. The weakest link governs: a strong bracket cannot make up for a weak cabinet face, short screws or a bracket that stops well short of the edge.
Matching the bracket to the material
| If your top is… | Think about |
|---|---|
| Thin porcelain or sintered stone | Follow the maker’s overhang limits exactly; plan continuous support under cutouts |
| Natural stone with veining or fissures | Closer spacing and a fabricator’s judgment on the weak spots |
| Quartz | Check the maker’s guide; most allow modest overhangs without brackets, but seating depths usually need them |
| Solid surface | Underlayment plus brackets as the overhang grows |
| Laminate or butcher block | Usually supported by substrate; brackets still help on deep seating |
If you are still choosing a surface, our guides to choosing the right kitchen countertops and Tampa countertop choices cover the trade-offs.
What to check before you buy brackets
Bracket shopping comes last. Check these first:
- Material and thickness. Find the manufacturer’s installation guide for your exact product.
- Overhang depth and seating plan. Measure how many stools, and where.
- Cutouts and seams. Mark any sink, cooktop or seam that falls near the overhang.
- The base. Is it a cabinet box, a pony wall or a knee wall? Is it framed with 2×4 or 2×6 lumber?
- Wall or cabinet condition. Cabinet faces and drywall are not structure.
- Warranty terms. Some countertop makers void coverage if their support rules are not followed.
Iron Supports is blunt about the mounting structure: its hidden L brackets must anchor into a header or vertical stud, with the horizontal leg fully bearing on 2×4 or 2×6 framing. Drywall, weak cabinet faces and unreinforced metal studs are not acceptable. If your island is a stock cabinet with a thin back panel, the brackets may need a reinforced frame or a pony wall added during the remodel.
Layout matters too. Brackets inside a cabinet can interfere with drawers and storage. Planning where they land alongside kitchen island storage ideas avoids discovering that a drawer bank sits right where a bracket has to go.
How hidden brackets get installed
This is the general sequence for hidden island brackets, based on Iron Supports’ instructions. Treat the manufacturer’s sheet for your bracket as the final word.
- Mark locations. Start about 6 inches in from each end and space brackets 18 to 24 inches apart.
- Cut the channel. Cut a level 1/2-inch channel in the cabinet top rail so the bracket sits flush.
- Fasten. Secure each bracket to the cabinet with two screws, then check that it is level.
- Seal and set. Apply silicone before the countertop is set, as the manufacturer’s steps describe.
For L brackets on a wall or pony wall, the work starts with finding solid framing. A good guide to locating wall studs helps you confirm where the lumber actually is before anything gets drilled.
One caution that deserves its own line: on a stone top, the bracket work happens before the slab arrives, and the slab is set by the installer. Setting heavy stone is a two-person-plus job, and a mislevel bracket becomes a crack later. This is a job for your contractor or fabricator, not a weekend project.
Can you add support to an existing countertop?
Sometimes, but there is no one answer. If the overhang is already in place and the cabinet or pony wall beneath is solid, a installer may be able to add brackets by cutting channels in the cabinet or fastening to framing, depending on how the slab was set. If the slab has cracked at a corner or near a cutout, support alone will not repair it. Raising or lifting a stone top can also break it or the adhesive bond. We would not attempt either without a professional looking at the actual slab, its adhesive and the base. Check your warranty before work starts.
Our perspective
Most overhang failures we hear about trace back to the plan, not the bracket. Someone chose a slab, then a stool height, then looked for a place to hide the steel. By then the cabinet is built and the fabricator is waiting.
Because we handle design and construction under one roof, the bracket question is settled early. The island is drawn with its overhang, the material’s published limits are checked, and any framing the brackets need is built into the cabinet or pony wall before the top is cut. Each project has a dedicated Lead Carpenter who owns that framing, and our Work Clean System keeps dust down while we do it. The price list itemizes the work up front, so support hardware is not a surprise line at the end.
Our advice for homeowners: decide how many people you want to seat, then work backward to the overhang, then the bracket. Do not do it in the other direction.
— MediaBeast
Planning an island or kitchen with proper support
If you are redoing a kitchen in the Tampa area, we can design the island, specify the countertop and build in the support together. Our published pricing for a small U-shaped kitchen with island runs from $41,200 to $52,050, and a large kitchen with island from $74,100 to $93,600. Final cost depends on scope and materials. See our kitchen remodeling page to start a project.
FAQ
What is the best material for countertop brackets?
Steel is the standard for hidden and structural brackets because it carries load in a thin profile. Wood corbels work for visible, decorative support but take up more knee space. Whatever the material, the rating only applies when the bracket is anchored into solid framing.
What is the overhang on a kitchen island called?
It is simply called the countertop overhang. On the seating side of an island it is also called the knee space or bar overhang. It is the part of the top that extends past the cabinet face.
How far apart should brackets be?
Manufacturers commonly call for 16 to 24 inches on center. Iron Supports advises no more than 24 inches when in doubt. Heavier stone or thinner slabs need tighter spacing, and the end brackets sit in from the edges.
Do hidden brackets work with quartz and granite?
Yes, hidden brackets are widely used with granite, quartz and marble, and the maker’s installation guide for your slab sets the minimum overhang that needs them. Ask your fabricator to confirm the plan before cabinets are built.
Sources
- How to Choose a Countertop Overhang, The Spruce
- Corian technical drawing: countertop overhangs
- Dekton countertops design and installation, Cosentino
- Technical content, Cosentino
- Overhangs, SapienStone
- Supporting the Bermuda corner of countertops, Federal Brace
- Hidden brackets vs corbels, Federal Brace
- Freedom hidden countertop brackets, Federal Brace
- Hidden island countertop bracket, Iron Supports
- Hidden island bracket installation instructions, Iron Supports
- Hidden granite L bracket installation, Iron Supports
- Standard front mount bracket instructions, Iron Supports
- Steel countertop support brackets: technical information, Outwater