
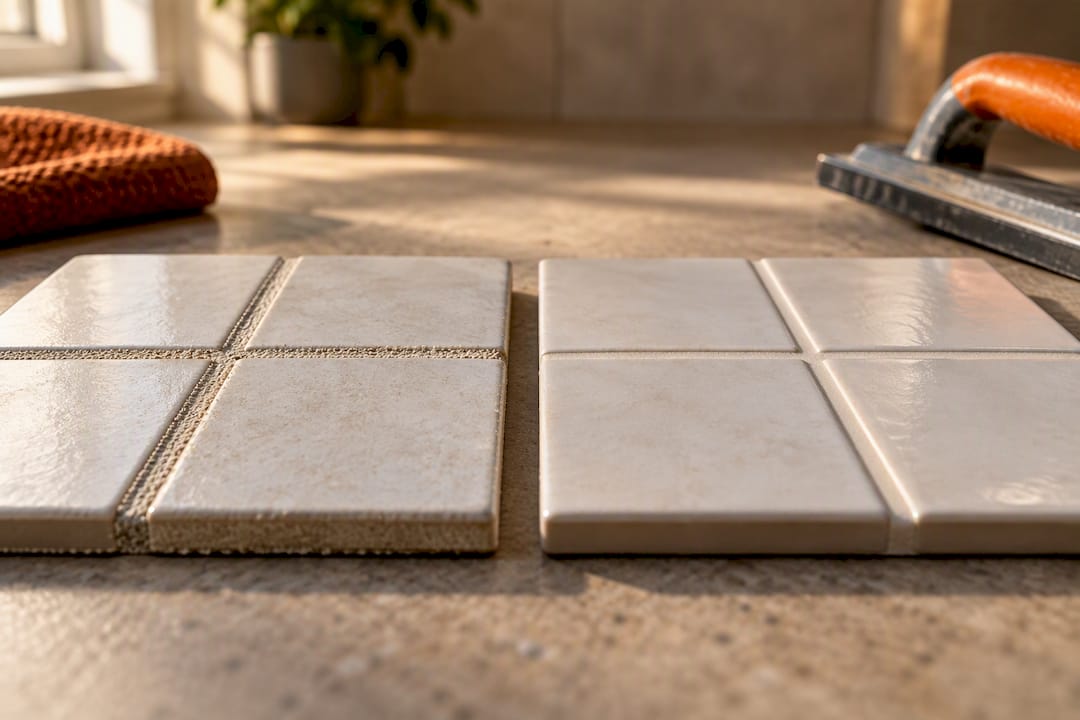
Use unsanded grout for joints 1/8 inch (3 mm) or less, and sanded grout for joints wider than that, up to about half an inch. The one exception: if your tile is polished, soft or scratch-prone, lean toward unsanded even in a wider joint, and always confirm the range on the product’s technical data sheet before you buy.
TL;DR:
- Use unsanded grout for joints 1/8 inch or less, especially on polished, soft, or scratch-prone tiles, regardless of joint width.
- Sanded grout is suitable for joints wider than 1/8 inch up to about 1/2 inch, providing strength and shrink resistance on high-traffic floors.
- Always confirm grout product limits on the technical data sheet, as formulations vary and may extend the typical joint-width recommendations.
- For shower walls and backsplashes, unsanded or epoxy grout is preferred to prevent scratching and handle moisture better.
- Applying grout correctly involves strict mixing ratios, prompt haze removal, sealing after curing, and choosing advanced grout types for high-moisture areas.
Table of Contents
- What’s actually in sanded and unsanded grout
- How to choose: joint width, tile type, and the product data sheet
- Room-by-room: what to use where
- Installation, sealing, and maintenance basics
- When epoxy and modern grouts make more sense
- Where DIY ends and hiring a pro starts making sense
- How Bath & Kitchen Gallery handles tile and grout decisions for you
- Manufacturer resources worth checking before you buy
- Sources
- FAQ
What’s actually in sanded and unsanded grout
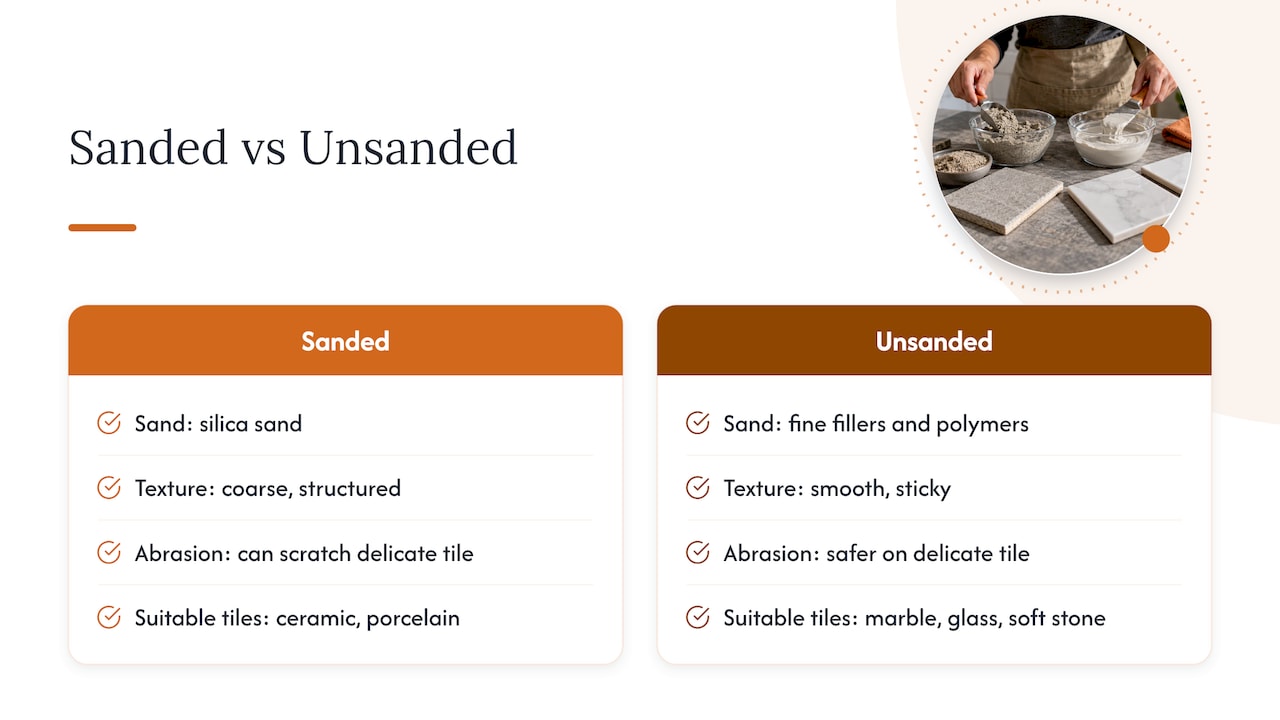
Both grouts start with cement, but what gets mixed in changes how they behave. Sanded grout adds silica sand, sometimes with polymers, which makes it stronger and less prone to shrinking as it cures. That extra structure is why sanded grout works well on heavy-traffic floors, where it needs to resist compression and hold its shape in wider joints without cracking.
Unsanded grout swaps the sand for finer fillers and polymers, which gives it a smoother, stickier texture. That stickiness helps it cling to vertical surfaces without slumping, but it also means less bulk to resist movement in a wide joint.
The trade-off comes down to texture and abrasion. Sanded grout’s sand content can scratch delicate, polished, or soft materials such as marble, natural stone, and glass, while unsanded grout’s smoother finish is the safer bet on those surfaces. Neither grout is inherently better. The right one depends on the joint you’re filling and the tile you’re filling it around.
How to choose: joint width, tile type, and the product data sheet
Joint width is the first filter. Unsanded grout is generally formulated for joints 1/8 inch (3 mm) or less, while sanded grout is typically used for joints from 1/8 inch up to 1/2 inch. Below that threshold, sanded grout tends to shrink and crack because there isn’t enough joint depth to hold the aggregate properly.
A few situations break the simple rule:
- Lugged or self-spaced tiles can leave an effective joint so narrow that sanded grout produces a rough or uneven “fuzzy joint,” making unsanded grout or a specialty product the better fit.
- Scratch-prone materials like marble, glass, and polished stone usually call for unsanded grout regardless of joint width.
- Some modern formulations are engineered to work across a broader range of joint widths than the classic rule allows.
Because formulations vary by manufacturer, the 1/8 inch rule is a baseline, not a universal law. Check the technical data sheet for the specific product you’re buying before you commit to a joint size or grout type.
Room-by-room: what to use where
Different rooms put different demands on grout, from foot traffic to standing water, so the right choice shifts by application.
- Floors usually call for sanded grout, since wider joints and constant foot traffic need the added strength and shrink resistance sand provides.
- Backsplashes and other vertical surfaces typically use unsanded grout, since joints tend to be narrow and many backsplash tiles (glass, polished ceramic) scratch easily.
- Shower walls generally favor unsanded or epoxy grout for the same scratch and joint-width reasons that apply to backsplashes.
- Shower pans may need sanded or epoxy grout depending on the waterproofing system and slope, so check the tile selection guidance for your specific setup.
- Marble, glass, and polished stone, wherever they’re installed, should generally get unsanded or epoxy grout, and it’s worth testing a small area first to confirm neither scratching nor staining shows up before grouting the whole surface.
For shower-specific tile decisions, the wet environment adds another layer worth thinking through before you settle on a grout.
Installation, sealing, and maintenance basics
Getting the grout type right is only half the job. How you mix, finish, and maintain it determines whether it holds up.
- Mix strictly to the manufacturer’s water ratio. Too much water causes pinholing and efflorescence, the white haze that appears when excess water pulls minerals to the surface.
- Clean up grout haze promptly, but let the grout hit its initial cure window first. Washing too early or too aggressively can pull grout out of the joint and cause color inconsistency.
- Seal grout once it’s fully cured, and reseal on a schedule that fits the room. Showers and kitchen backsplashes see more moisture and grease, so they generally need more frequent attention than a dry hallway floor.
- Test absorbent or porous tiles before grouting. A grout release or sealer applied to the tile face can prevent permanent pigment staining on tiles that soak up color.
Pro Tip: Grout a small test patch first, let it cure fully, and check for scratching, staining, and color before you commit to the whole room.
Routine cleaning matters too. Grout haze and mildew build up over time, and services like professional tile grout cleaning can restore color and seal integrity once a job is a few years old.
When epoxy and modern grouts make more sense
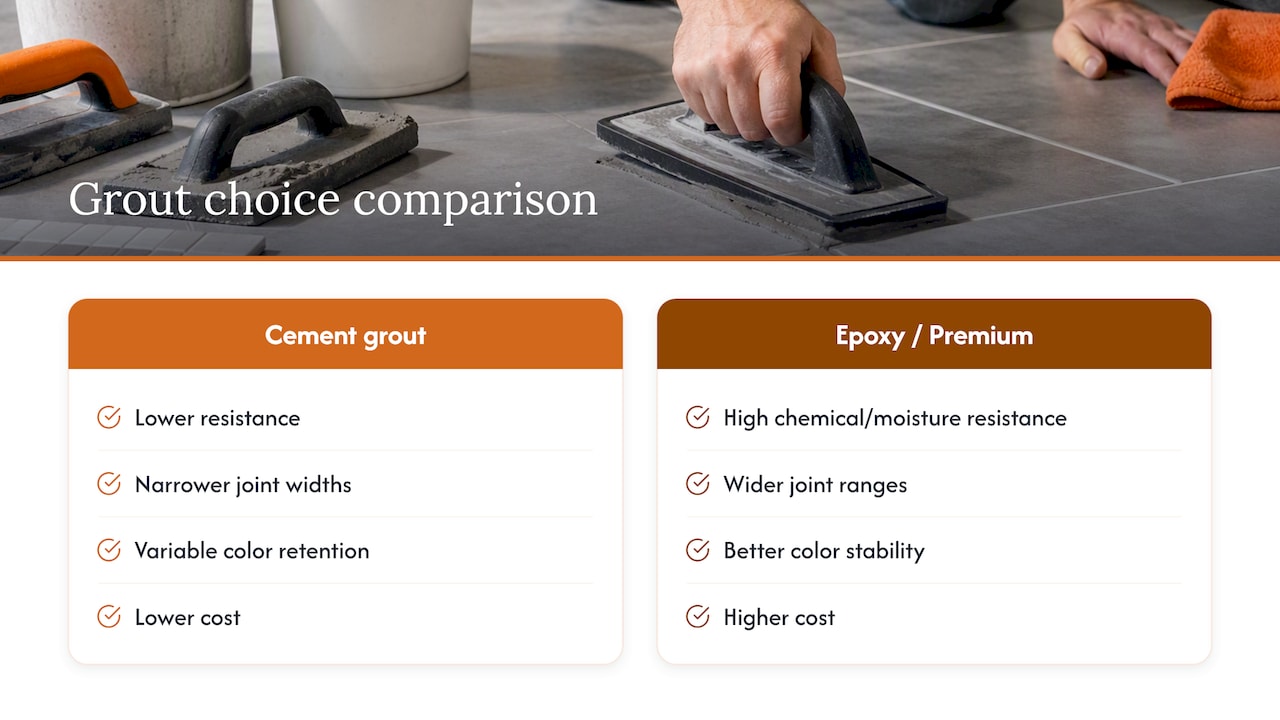
Standard cement-based grout isn’t always the right call. Epoxy and premium single-component grouts resist chemicals, stains, and moisture better than traditional cement mixes, which makes them worth considering for kitchens, showers, and anywhere spills are frequent.
Some of these advanced formulations also allow broader joint-width ranges and hold color more consistently than standard sanded or unsanded grout, which can simplify the sanded-versus-unsanded decision entirely. The trade-off is cost and workability: epoxy grout costs more, cures faster once mixed, and is harder to clean off tile faces if you’re not moving quickly. For high-value stone or a shower that needs to resist moisture for decades, that extra effort often pays off.
Where DIY ends and hiring a pro starts making sense
Choosing between sanded and unsanded grout is manageable for most homeowners. What gets harder is verifying manufacturer limits, planning movement joints, and waterproofing a shower pan correctly, especially with high-value stone or a complicated substrate.
That’s where a contractor earns their fee. A good one checks the technical data sheet against your actual tile, builds a mockup before committing to a full room, and plans movement joints so the installation doesn’t crack a year later. If your project involves a full wet-area rebuild rather than a simple regrout, that kind of oversight matters more than the grout choice itself.
— MediaBeast
How Bath & Kitchen Gallery handles tile and grout decisions for you
If your project has moved past a weekend regrout and into a full renovation, that’s a different scope of work, and it’s where we come in. Bath & Kitchen Gallery handles design and construction under one roof, so tile, grout, and waterproofing decisions get made by the same team building your bathroom or kitchen, not handed off between subcontractors.
- Manufacturer technical data sheets and joint-width limits are verified before installation to avoid problems.
- Projects typically receive dedicated management and transparent pricing so the scope and cost are clear before work starts.
- A clean-work system is used to help keep dust and disruption contained during tile and grout work.
If you’re planning a shower rebuild, check our Tampa shower remodeling services or get a sense of project scope on our bathroom remodel cost page to see what a professionally planned tile and grout job actually involves.
Manufacturer resources worth checking before you buy
Before grouting, check the product’s own limits rather than relying on general rules. LATICRETE’s cement grout troubleshooting guide, Custom Building Products’ Polyblend TDS, and Custom’s bulletin on joints under 1/8 inch all spell out exact limitations. Cross-check against ANSI/TCNA installation standards for movement joint placement.
Sources
- LATICRETE: Cement grouts troubleshooting / grout use guidance
- Custom Building Products: Polyblend TDS (sanded / non-sanded grout guidance)
FAQ
Is sanded grout ok in a shower?
Sanded grout can work on shower floors and pans where joints are wider, but it’s more likely to scratch soft or polished tile on shower walls. Many installers prefer unsanded or epoxy grout for shower walls and reserve sanded grout for the pan, depending on the tile and waterproofing system.
Does unsanded grout need to be sealed?
Yes, most cement-based unsanded grout benefits from sealing once fully cured, since it’s still porous and can absorb moisture and stains. Reseal periodically, more often in wet areas like showers than on a dry backsplash.
What’s the best grout for a shower?
There’s no single best answer since it depends on the tile and joint width, but unsanded or epoxy grout is commonly recommended for shower walls because it resists scratching delicate tile and handles moisture better than standard sanded grout. Epoxy grout in particular offers stronger stain and moisture resistance for wet areas, though it costs more and is harder to install.
Can I use unsanded grout on 1/4 inch joints?
Unsanded grout is generally formulated for joints 1/8 inch or less, so a 1/4 inch joint typically calls for sanded grout instead. Some modern formulations extend that range, so check the specific product’s technical data sheet before deciding.