
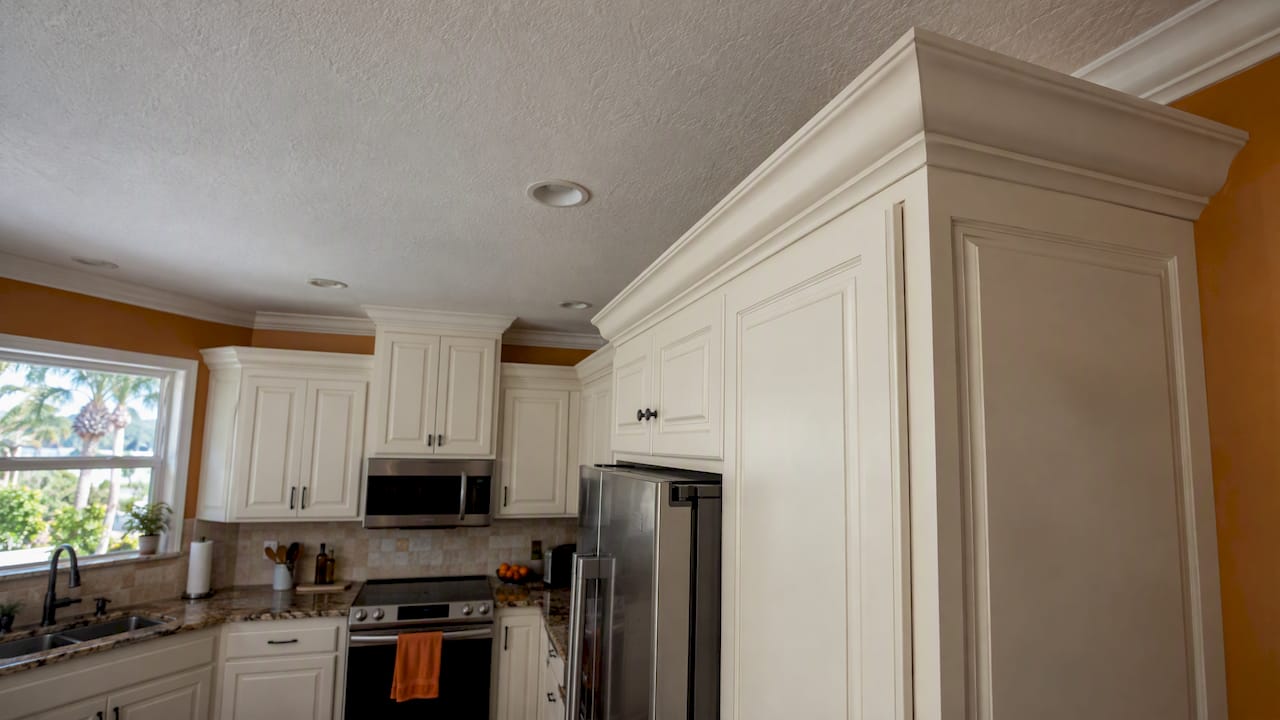
Cabinet crown molding is the trim that closes the gap between the top of your wall cabinets and the ceiling. It makes the cabinets look built in and finished. It suits most traditional and transitional kitchens. Flat-front modern cabinets often look better with a clean, crownless cap. This guide helps you decide, pick a profile and size, and understand how it goes on.
TL;DR
- Crown molding is not outdated. Designers still treat it as a classic detail, and it works best when it matches your home’s architecture and cabinet style.
- Match the profile to the door: ogee or stacked crown for raised-panel and traditional kitchens, cove or flat stock for Shaker and cleaner looks.
- Crown sits at an angle, so it needs compound cuts. Inside corners are usually mitered, and uneven ceilings are handled with caulk or scribing.
- Measure the full run and add 10% for waste before you order.
- If your cabinets are flat-front and European in style, a simple crownless cap is often the better finish.
Table of Contents
- Is crown molding on cabinets outdated?
- Cabinet crown molding styles and how they change the look
- How to choose the size and profile
- Our perspective: crown is a design decision, not an accessory
- How crown molding is installed on cabinets
- What to use instead of crown molding
- Add crown as part of a kitchen remodel
- FAQ
- Sources
Is crown molding on cabinets outdated?
No. Designers quoted by Livingetc describe crown molding as a classic element and do not expect it to go out of style soon. They add that whether it suits a kitchen depends on the home’s architecture and overall style. A separate design guide from 21Oak makes the same point from the other direction: crown gives cabinetry a polished, finished look and can be used in any style of kitchen.
The real question is not whether crown is fashionable. It is whether it fits the kitchen in front of you. Here is how we think about it.
Crown usually fits when:
- The cabinet doors have raised panels, beading or other traditional detail.
- The home is traditional, Mediterranean or transitional, with trim elsewhere such as baseboards, door casings and window trim.
- The cabinets stop short of the ceiling and you want the eye to travel up, so the kitchen feels taller and more intentional.
- You want to hide the gap and uneven edge where cabinet tops meet the ceiling.
A crownless finish may fit better when:
- The cabinets are flat-front, slab-style or European-style, where a heavy profile would fight the clean lines. Livingetc notes that modern kitchens of this type may call for a crownless cap.
- The cabinets run all the way to the ceiling, so there is nothing to finish.
- The rest of the home has minimal trim and a contemporary feel.
If you are deciding between door styles at the same time, our guides to cabinet door styles and Shaker versus slab cabinets will help, because the door you choose largely decides the crown you choose. Homes that sit between traditional and modern often suit a transitional decor style, where a simple crown profile is a good bridge.
Cabinet crown molding styles and how they change the look
Crown profiles differ in how much shadow they cast, how much of a gap they cover, and how many separate pieces and corners they involve. The common families are flat, cove, stepped, stacked and ogee, with decorative options such as dentil added on top.
| Profile | Look | Best with | Things to know |
|---|---|---|---|
| Flat stock | Clean, contemporary lines | Slab and simple Shaker doors | Minimal shadow line, easiest to install |
| Cove | Soft concave curve, subtle detail | Casual and transitional kitchens | Less intricate than full crown |
| Ogee | Traditional S-shaped curve | Raised-panel doors, traditional spaces | Strong, formal presence |
| Stacked (built-up) | Layered, dramatic, substantial | Tall ceilings, large kitchens | More parts, more corners, more labor |
| Stepped | Defined shelves of shadow | Craftsman and transitional styles | Reads as architectural rather than ornate |
This summary draws on a style overview of cabinet crown options that pairs flat stock with contemporary lines, cove with subtle detail, ogee with raised-panel doors and traditional spaces, and stacked crown with taller ceilings. In every case, crown makes the cabinetry feel taller, cleaner and more connected to the room.
Material and finish
Crown is made from solid wood, wood veneer over a core, or paint-grade materials. The simplest rule is to match it to the cabinets. A stained maple or oak cabinet looks best with crown in the same species and finish. A painted cabinet needs a paint-grade crown painted to match. If you are still choosing a wood, see our comparison of maple versus oak cabinets.
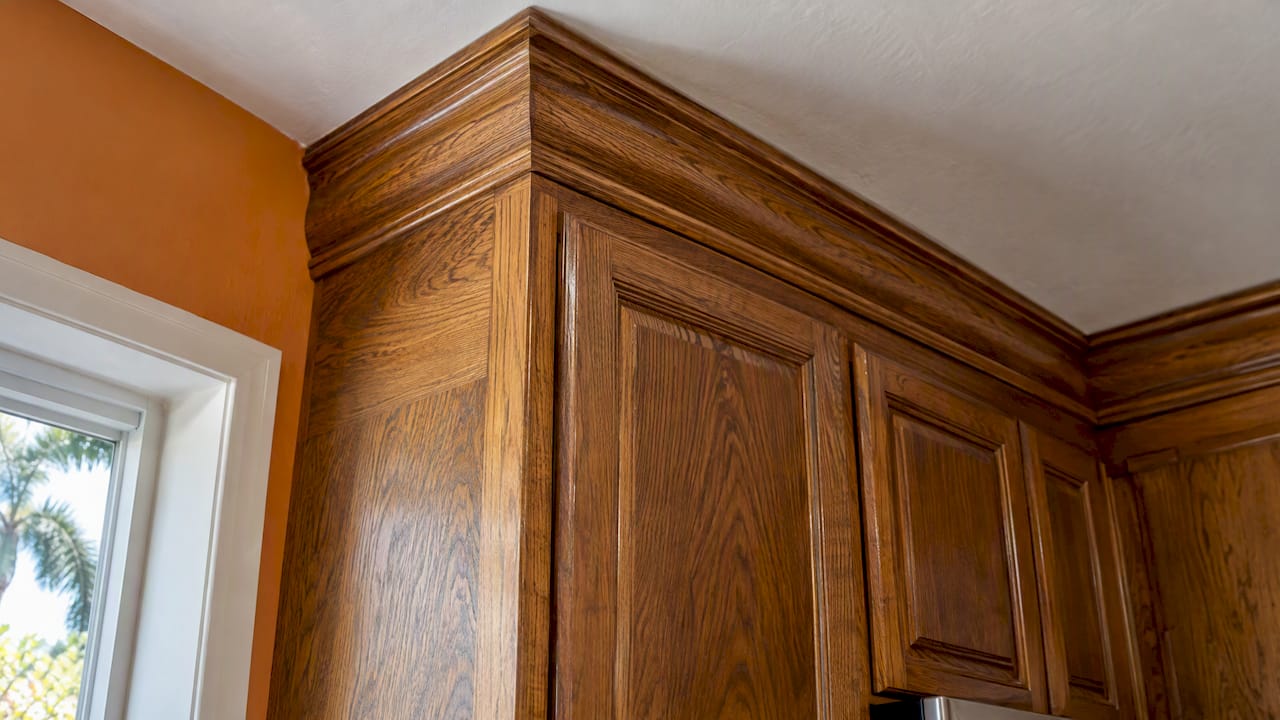
In Florida kitchens, humidity is a practical factor. Wood trim moves with moisture, so a well-sealed, properly finished crown and a climate-controlled home help the joints stay tight over the years.
How to choose the size and profile
Size is where most DIY-looking crown goes wrong. A profile that is too small looks like an afterthought. One that is too large crowds the cabinet and the ceiling. There is no single official standard, so these are the principles we use when we design a kitchen.
Start with the space above the cabinets
Measure from the top of the cabinet to the ceiling. This gap sets what you can do.
- A small gap: Use a modest crown that covers the gap and finishes the top edge. Stacking several pieces would eat the space and look cramped.
- A medium gap: A standard single-piece crown, scaled to the cabinet height, usually looks right.
- A tall gap: You have room for a stacked or built-up crown, or for a taller riser board under the crown to lift the visual line. Otherwise the open space can look like an unfinished void.
Scale to the cabinet and the room
Large kitchens and tall ceilings can carry a bigger, more layered crown. In a small kitchen, a lighter profile keeps the room from feeling heavy. Look at the other trim in your home. If your baseboards and door casings are simple, a very ornate crown will look out of place, and the opposite is also true.
Check the ceiling before you fall in love with a profile
Ceilings and walls are rarely perfectly flat or level. A profile with a deeper return, or a design that includes a flat riser, hides small variations better than a thin delicate profile does. If your ceiling dips noticeably, tell your designer early. A cabinet maker can account for it when the cabinets are built, which is easier than fixing it afterward.
A quick decision path
- Pick your door style first.
- Choose the profile family that suits it (see the table above).
- Measure the gap to the ceiling and pick a height that fits it.
- Compare the proportion with your existing trim.
- Ask to see a sample held against the cabinet before ordering.
Our kitchen cabinet design guide walks through how the whole cabinet package comes together, including these finishing details.
Our perspective: crown is a design decision, not an accessory
Crown molding is one of the details that homeowners often leave until last, and that is when it goes wrong. At Bath & Kitchen Gallery, we handle design and construction under one roof, so the crown is decided together with the door style, the cabinet height and the ceiling condition. Nothing is left for someone else to figure out on installation day.
We recommend sketching the crown into the plan at the start. That way the cabinets are ordered at a height that makes sense, the profile suits the doors, and the finish carpenter knows what to expect. Each project has a dedicated Lead Carpenter who sees it through, so the person who cuts your corners also knows why they were designed that way.
Trim work creates dust, and finish carpentry happens inside a home where families are living. Our Work Clean System is built to minimize dust and disruption, so installing crown does not turn your kitchen into a worksite you cannot stand. And because our pricing is up front with detailed item lists, the trim is accounted for in the plan rather than showing up as a surprise later.
MediaBeast
How crown molding is installed on cabinets
Here is the process, so you know what a good installer is doing. This is an overview for understanding, not a substitute for a professional. Cutting crown is one of the harder trim skills.
Why crown is tricky
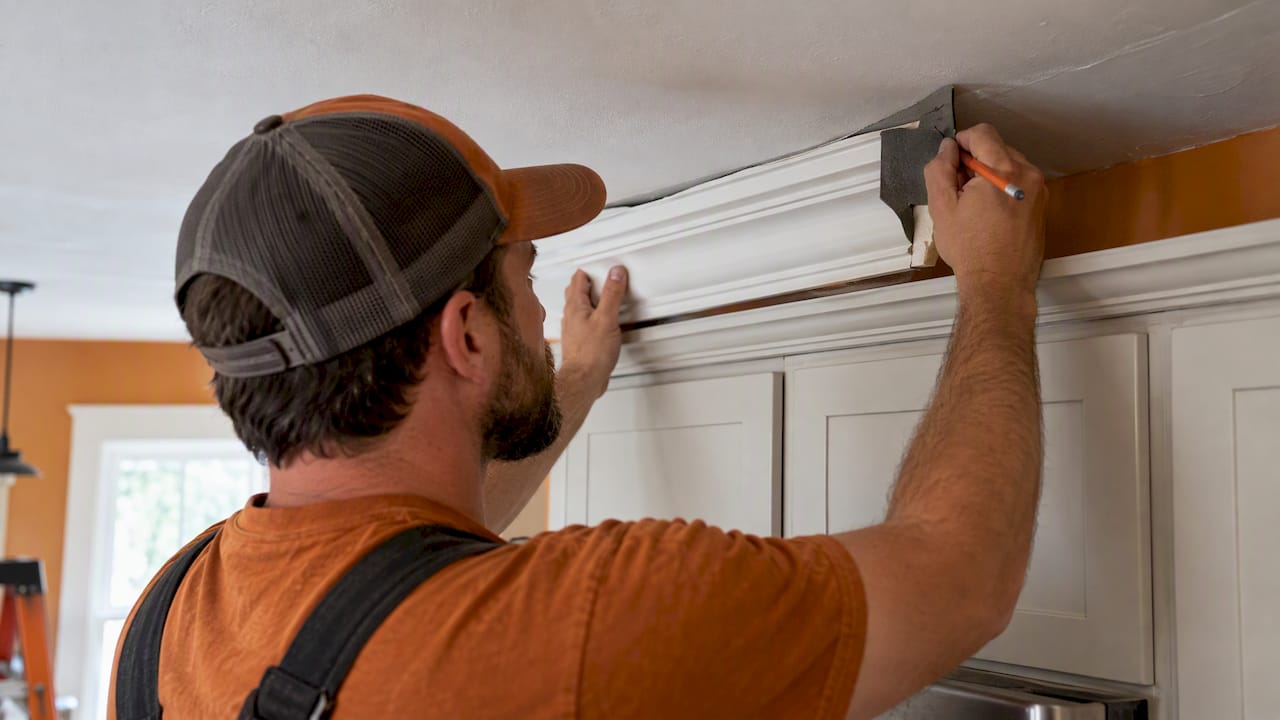
Crown molding is “sprung,” which means it sits at an angle between the cabinet and the wall or ceiling. According to This Old House’s installation guide, it has to be oriented in a specific way on the saw: the saw fence acts as the wall and the saw bed acts as the ceiling. That produces compound cuts, which are angled in two directions at once.
The general sequence
- Plan the layout. Decide where each piece runs and where the joints fall. Longer continuous runs mean fewer visible seams.
- Install any riser or backer. Many cabinet crowns use a nailing strip or a riser board that gives the crown something solid to attach to. Cabinet-mount crown profiles are commonly made with a nailing strip for this purpose.
- Cut the corners. Inside corners can be mitered, as This Old House explains for crown corners. Outside corners are mitered as a matched pair.
- Test-fit before fastening. Dry-fit each piece and check the joints.
- Fasten and fill. Secure the crown, fill nail holes, and sand lightly.
- Caulk and finish. Caulk small gaps and touch up the paint or stain.
Dealing with uneven walls and ceilings
Gaps are normal in real homes. Small ones are closed with caulk. Larger ones are handled by scribing, which means shaping the molding to follow the surface it meets. The same This Old House guidance covers both approaches. When a ceiling is wavy, a skilled carpenter reads the high and low points before cutting rather than forcing the molding flat.
How much to order
Measure the full perimeter of every cabinet run where crown will go, then add a waste allowance. A common rule of thumb, mentioned in Lowe’s molding installation guide, is to add 10% to your measured length. Miter cuts and test pieces use up more material than most people expect, especially with repeating patterns or stained wood you want to match by grain.
Trim details like this are part of a larger finishing picture. This overview of the role of trims in kitchens shows how edges and transitions help a kitchen look complete.
What to use instead of crown molding
If crown feels too formal or too complex, you have options.
- Cove molding. It has a simpler concave profile than crown and is a common alternative, as Lowe’s trim guide notes.
- A flat or square cap. A simple straight band that closes the gap. It suits Shaker and slab cabinets.
- A light rail or skirt. Used on the underside of upper cabinets to finish the bottom edge, which is a different place from the top but helps the cabinet look finished.
- Cabinets to the ceiling. Taller uppers remove the gap entirely, so no crown is needed. They also add storage.
- A crownless cap with a shadow gap. A modern look where the cabinet stops cleanly, often paired with flat-front doors. Our page on modern cabinet styles shows what that style looks like, and our tips for a contemporary kitchen cover the finishing choices.
Add crown as part of a kitchen remodel
Crown molding is easiest to get right when it is planned with the cabinets, not bolted on afterward. Bath & Kitchen Gallery designs and builds kitchens in the Tampa area with up-front pricing, a dedicated Lead Carpenter and a Work Clean System that limits dust and disruption. You can also visit our local showroom to see profiles and finishes in person.
For a sense of budget, our published price ranges for complete kitchens include $41,200 to $52,050 for a small U-shaped kitchen with an island and $62,600 to $79,100 for a large L-shaped kitchen with an island. Final cost depends on scope and materials. See the full list on our kitchen remodel costs page, or start a conversation about kitchen remodeling in Tampa.
FAQ
Should you put crown molding on kitchen cabinets?
In most traditional and transitional kitchens, yes. It finishes the top of the cabinets and hides the gap to the ceiling. In modern kitchens with flat-front cabinets, a simple crownless cap may look cleaner.
Is crown molding on cabinets outdated?
No. Designers cited by Livingetc see it as a classic element and do not expect it to go out of style. What matters is that the profile suits your cabinets and your home’s architecture.
How do you attach crown molding to a cabinet?
Cabinet crown is usually fastened to the cabinet box, often through a nailing strip or a riser board. Because crown sits at an angle, the corners need compound cuts, and gaps are closed with caulk or by scribing. A finish carpenter will dry-fit each piece before nailing.
What can you use instead of crown molding on kitchen cabinets?
Cove molding is a simpler alternative with a less intricate concave profile. You can also use a flat cap, run the cabinets to the ceiling, or finish with a clean crownless cap on modern cabinets.
How much crown molding do I need?
Measure the total length of every cabinet run where it will go, then add about 10% for waste from miter cuts and test pieces. Ask your installer to confirm the final count against the layout.
Sources
- Is Kitchen Cabinet Crown Molding in Style? (Livingetc)
- How to Add Crown Molding to Cabinets (21Oak)
- Kitchen Cabinet Crown Molding Fort Myers Guide
- How to Cut Crown Molding Inside Corners (This Old House)
- How to Install Wood Crown Molding (This Old House)
- Install Decorative Moulding: Crown and Cove (Lowe’s)
- What Is Transitional Decor Style: A Clear Guide
- The role of trims in kitchen fitouts