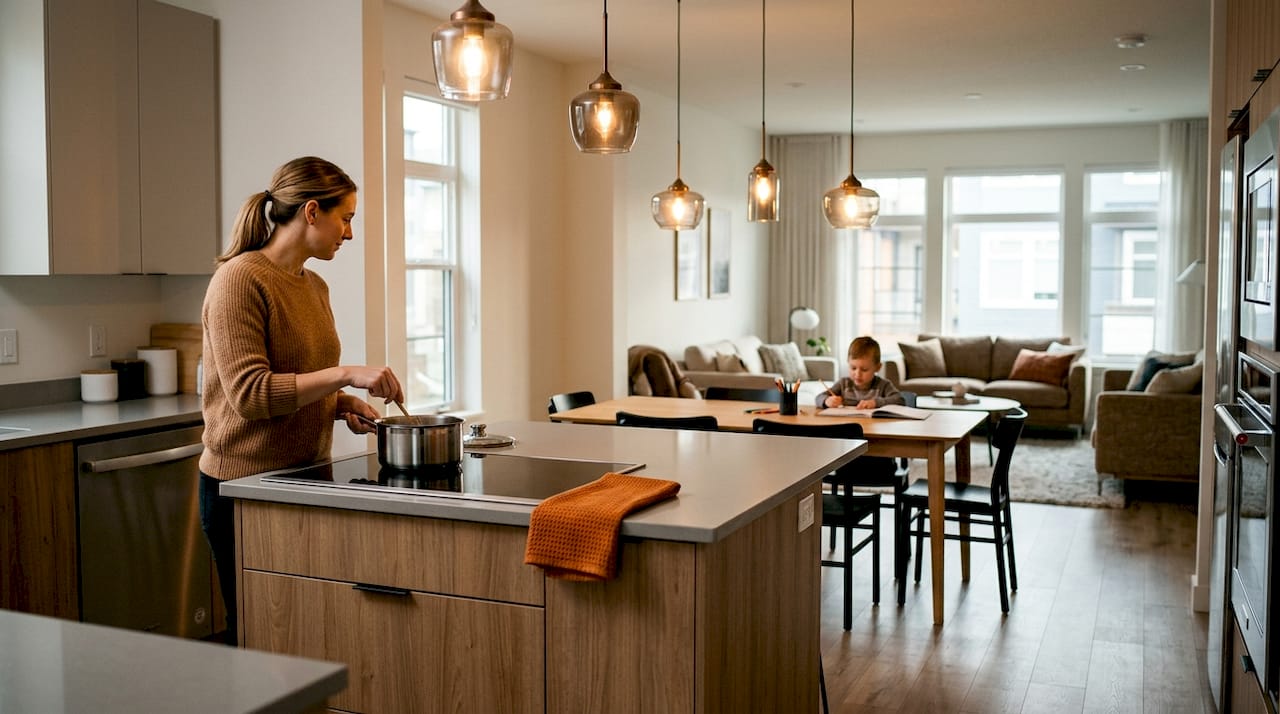


Size your island around clearance, not countertop. A single cook needs a 42-inch work aisle on every side, while two cooks working at once need 48 inches, per the National Kitchen and Bath Association. Once you’ve carved out that space, the footprint that’s left usually lands in one of three ranges: small islands around 4 feet by 2 feet, medium islands around 6 feet by 3 feet, or large islands at 8 feet by 4 feet and up.
TL;DR:
- Islands wider than 4 feet risk creating dead zones in the middle, especially if they exceed 5 feet in width in less spacious kitchens.
- For two cooks or high-traffic areas, a minimum walkway of 48 inches is recommended, with 42 inches suitable for single-cook kitchens.
- Seating overhang should be about 12 inches for standard countertops and up to 15 inches for bar height, with proper supports to prevent cracking.
- Plumbing or cooktops require at least 7 feet of length on the island, and electrical or venting plans should be finalized before cabinet installation.
- Test planned island sizes in your current space by tape or tables, and ensure appliance doors and walkways operate smoothly before finalizing design.
Table of Contents
- What Are Standard Kitchen Island Sizes?
- How Wide Should the Walkway Around an Island Be?
- How Much Overhang Do You Need for Island Seating?
- Should You Put a Sink or Cooktop on Your Island?
- How Do You Size an Island for Your Kitchen’s Layout?
- Test Your Island Size Before You Build It
- What Countertop Material and Thickness Work Best for an Island?
- Where Should Kitchen Island Lighting Go?
- How Should You Plan Island Storage and Cabinetry?
- What Accessibility Standards Apply to Island Design?
- Design Perspective: Function Beats a Big Island Every Time
- How Tampakitchenandbath Turns These Numbers Into a Real Kitchen
- Where These Island Sizing Numbers Come From
- Sources
- FAQ
What Are Standard Kitchen Island Sizes?
Most islands fall into one of three practical categories, and picking the wrong one for your kitchen is the single most common regret homeowners bring up during a remodel.
- Small islands (roughly 4 feet by 2 feet): These work as extra prep surface in a narrow galley kitchen. Don’t expect seating, storage for pots and pans, or room for a cooktop. Think of it as a landing pad, not a workstation.
- Medium islands (roughly 6 feet by 3 feet): This is the size most homeowners land on, and for good reason. It fits two to three barstools, real cabinet storage, and enough counter to actually cook on without elbowing your ingredients off the edge.
- Large islands (8 feet by 4 feet and up): These have room for a sink, cooktop, or both, plus generous storage. The catch is reachability. Anything wider than about 5 feet starts creating dead zones in the middle of the countertop that nobody can comfortably reach from either side, according to Fine Homebuilding’s design observations. In very large kitchens, two smaller islands often outperform one massive slab.
There’s a floor and a ceiling here worth knowing. Below about 40 inches long by 24 inches deep, an island stops feeling like an island and starts feeling like a kitchen table someone wheeled in, according to DG Floors’ guidance on minimum island dimensions. On the other end, once a single run passes roughly 4 feet in width, you’re reaching across dead space to grab anything in the middle. That’s the practical ceiling for a one-sided island, regardless of how much floor space you have to spare.
How Wide Should the Walkway Around an Island Be?
Clearance decides the size of your island long before countertop material or cabinet style enters the conversation. The NKBA sets three benchmarks, and knowing which one applies to your kitchen changes everything about how big that island can safely be.
- 36 inches is the bare minimum, and only in genuinely tight layouts where a wider aisle simply isn’t possible. Anything below this becomes hard to navigate with an oven door open.
- 42 inches is the standard for a one-cook kitchen. This is the number most residential kitchens should be designing around.
- 48 inches applies when two people cook at once regularly, or when the aisle also serves as a main walkway through the house, per the NKBA’s kitchen planning guidelines.
Traffic patterns matter as much as cook count. If the aisle beside your island doubles as the path from the garage to the pantry, or if anyone in the household uses a wheelchair or walker, push toward 48 inches even if only one person typically cooks. Appliance door swings eat into these numbers fast, too. An open dishwasher or oven door can consume 30 to 36 inches of floor space on its own, so the clearance you measure with everything closed isn’t the clearance you actually have during a normal cooking session.
The only way to know for sure is to test it. Tape the island’s footprint on your existing floor, open every appliance door that will face it, and walk your normal path with a stack of dishes in hand. If you’re reaching, twisting, or bumping a cabinet, the aisle is too narrow, no matter what the plan says.
Pro Tip: Test with the dishwasher door open and a second person standing at the stove at the same time. That’s the real-world pinch point most floor plans miss.
How Much Overhang Do You Need for Island Seating?
Comfortable island seating comes down to three numbers, and getting any one of them wrong is why so many island bars end up feeling cramped despite looking spacious on paper.
- Seat width: Budget 22 to 24 inches per diner at minimum, and 26 to 28 inches if you want elbow room for a family that lingers over breakfast.
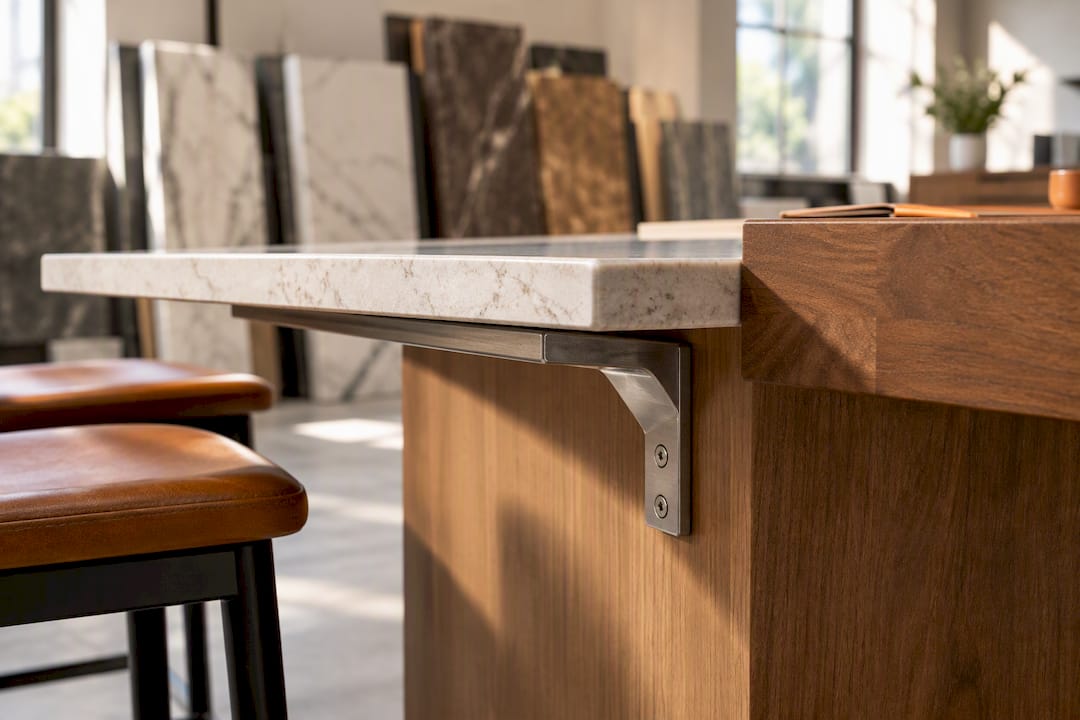
- Overhang depth: For a standard 36-inch counter, plan for about 12 inches of overhang. Bar-height counters at 42 inches can go up to 15 inches, though anything past 12 inches typically needs a corbel or steel bracket underneath, since unsupported stone that far past the cabinet edge is a cracking risk.
- Behind-seat clearance: If nobody ever walks behind a seated diner, 32 inches from the counter edge is enough. Add a walkway back there and you need 36 inches. If someone has to comfortably pass behind a seated person on a regular basis, budget 44 inches, according to NKBA design and construction guidance.
That third number is where most kitchen plans quietly fail. Homeowners size the seating side of the island like it’s decorative, then discover during move-in that anyone walking behind a seated guest has to ask them to scoot in. Knee space depth also shifts with counter height: 18 inches for 30-inch counters, 15 inches for 36-inch counters, and 12 inches for 42-inch bar seating, per the NKBA’s planning guidelines. Get that wrong and knees hit the cabinet face before the meal’s even served.
Should You Put a Sink or Cooktop on Your Island?
Adding plumbing or a cooktop to an island changes the math on length, not just depth. You generally need at least 7 feet of island length to fit a sink or cooktop and still leave usable prep space or seating on the same run. Squeeze it into a 6-foot island and something gets sacrificed, usually seating.
- Floor-mounted plumbing and vent stack routing need to be settled early. Moving a sink location after framing is finalized routinely adds cost and time to a project, per NKBA’s design and construction guidance.
- Electrical code-style planning calls for at least one dedicated receptacle on any island wider than 48 inches, with GFCI protection required on every island work surface.
- A cooktop needs ventilation, whether that’s a downdraft system or a ceiling-mounted hood, and both have real implications for ceiling height and duct routing that are far easier to plan before drywall goes up than after.
The pattern to watch for: every homeowner who’s had to relocate a sink mid-project says the same thing. Nail the plumbing and electrical plan before the cabinets are ordered, not after.
How Do You Size an Island for Your Kitchen’s Layout?
A widely repeated rule of thumb says to keep your island at roughly 10% of your kitchen’s total square footage, a benchmark The Spruce’s kitchen island planning guide uses as a sanity check rather than a hard rule. Treat it exactly that way. Clearance always wins if the two numbers conflict, since a technically proportional island that leaves 30 inches of aisle space is still an island you’ll resent using.
- Measure the room. Get the full width and depth of your kitchen footprint, wall to wall.
- Subtract required aisles. Pull 42 or 48 inches off every side the island borders, depending on your cook count and traffic pattern.
- See what’s left. Whatever rectangle remains is your real island envelope, not the aspirational one from a magazine photo.
- Match the footprint to the envelope. If the leftover space is narrow or oddly shaped, don’t force a standard island into it.
When the numbers don’t cooperate, you have real alternatives. A peninsula anchors to a wall and needs clearance on only three sides instead of four. A slim island at 18 to 24 inches deep adds counter space without eating into circulation. A rolling cart gives you flexible surface area you can push out of the way entirely. And in genuinely large kitchens, two smaller islands, one for prep and one for seating, often beat a single oversized one on every metric that matters. Our kitchen island sizing overview walks through how these choices play out in an actual renovation.
Test Your Island Size Before You Build It
The single most reliable way to validate an island size is to live with it before it’s real. Tape the exact footprint on your current kitchen floor, or set a folding table where the island would sit, and leave it there for at least a week.
- Walk your normal cooking routine around the taped footprint every day, not just once.
- Open every appliance door that would border the island and check for collisions.
- If two people cook in your house, have both of you work around it at the same time.
- Map where outlets, GFCI protection, and dedicated circuits need to land before drawings are finalized.
- Note pendant light placement and test the height with a broom handle or step stool.
Pro Tip: Put a stack of dinner plates in your hands and walk the route from the island to the table. If you hesitate anywhere, that’s your pinch point, and it’s cheaper to fix on tape than in granite.
Beyond the walk test, a few technical checkpoints deserve a second look before construction drawings lock in: outlet spacing across the island’s activity zones, GFCI coverage on every work surface, a dedicated circuit for any cooktop, and confirmed routing for plumbing or vent stacks. Coordinating these with your contractor before cabinets are ordered avoids the kind of mid-project change order that stretches both the budget and the timeline.
What Countertop Material and Thickness Work Best for an Island?
Countertop thickness affects more than looks. It changes how far your overhang can safely extend and how the island reads in the room. Standard slab thickness runs about 1.25 inches (often called 3cm), and that’s thick enough to support a standard 12-inch overhang without extra bracing in most cases.
Push the overhang further, or choose a thinner material, and you need structural support underneath. Quartz and granite handle overhangs reasonably well at standard thickness, but anything approaching 15 inches, common on bar-height seating, generally needs steel brackets or corbels regardless of material. Butcher block and other wood countertops flex more than stone, so unsupported overhangs should stay conservative, closer to 10 inches, even on a shorter island.
Material choice also interacts with island size in a less obvious way: bigger islands mean bigger slabs, and large-format stone slabs come with seam considerations. An 8-foot island in quartz or granite may require a seam somewhere along its length, since most slabs top out around 9 to 10 feet before waste and handling become impractical. Placing that seam away from the sink or a high-traffic prep zone keeps it from becoming a visible, food-catching line down the middle of your workspace.
Durability matters more on an island than anywhere else in the kitchen, since it takes hits from every direction, not just from the wall side. Quartz resists scratching and staining better than marble, and butcher block, while forgiving to the touch, needs regular oiling to avoid drying out around a sink cutout. Whatever material you choose, match its edge profile to the overhang. A thin waterfall edge on a small island reads very differently than a thick, rounded edge on an 8-foot slab.
Where Should Kitchen Island Lighting Go?
Island lighting needs to do two jobs at once: light the work surface and set the mood for the room around it. Getting the placement wrong is one of the most common mistakes homeowners catch only after the drywall’s painted and the electrician has left.
Pendant lights are the default choice for a reason. Space them evenly along the island’s centerline, generally one pendant per 2 to 3 feet of length, so a 6-foot island gets two pendants and an 8-foot island often gets three. Hang them 30 to 36 inches above the countertop surface, measured from counter to the bottom of the fixture. That range clears sightlines for people standing or seated across the island while still throwing usable light onto the surface below.
Fixture size should scale with island length, not just personal taste. Oversized pendants over a small island crowd the sightline across the room; undersized fixtures over a large island leave dim gaps between the pools of light. If your island includes seating, keep pendants centered over the work zone rather than the seating zone, since a light hanging directly over someone’s head at the bar is more annoying than helpful.
Layer in recessed ceiling lights around the island’s perimeter for ambient light, especially if the pendants alone leave the counter edges in shadow. And if the island includes a cooktop, factor the range hood’s built in lighting into the plan so you’re not double lighting one zone while leaving another dim.
How Should You Plan Island Storage and Cabinetry?
An island’s storage capacity depends entirely on its depth, and this is where a lot of homeowners overestimate what a given footprint can actually hold. Standard base cabinets run 24 inches deep, which is why most functional islands need to be at least that deep on the storage side, even if the countertop overhangs further for seating.
Drawers generally outperform cabinets with shelves for island storage, since you can see and reach everything in a drawer without kneeling or digging. Deep drawers handle pots, pans, and small appliances; shallow drawers near the top handle utensils and tools used daily. If your island backs up to seating on one side, that side’s storage access disappears, so plan the working storage on the side that faces the rest of the kitchen instead.
Open shelving works on islands facing a dining or living space, giving a spot for cookbooks or serving pieces without the visual bulk of full cabinet doors, but it sacrifices the concealment a closed cabinet offers. Mixing the two, closed storage on the working side, a slim open shelf facing the seating side, tends to satisfy both function and display without compromising either.
Don’t forget trash and recycling. A pull-out bin built into the island is one of the more requested features in kitchen remodels, and it needs a dedicated 15 to 18 inch cabinet bay to fit standard bins comfortably. Plan that bay’s location before finalizing your drawer layout, since it’s one of the harder things to retrofit later.
What Accessibility Standards Apply to Island Design?
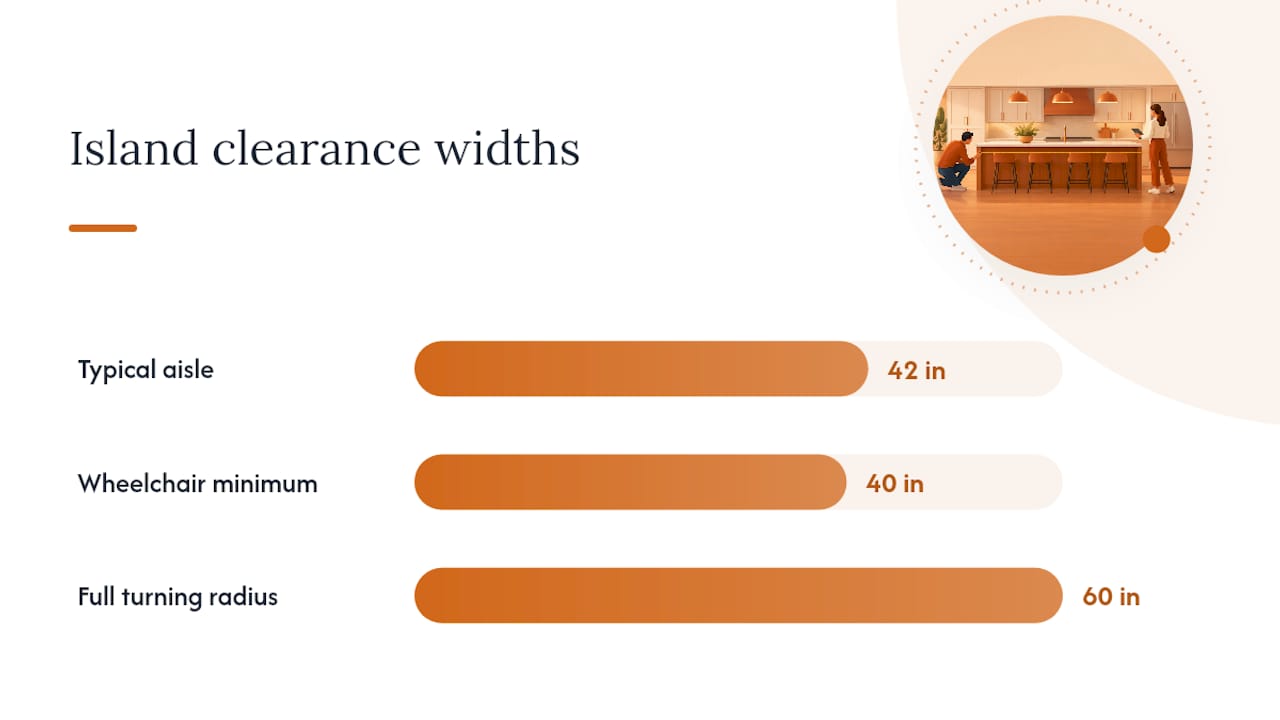
Accessible island design starts with clearance, and the numbers run wider than standard NKBA minimums. A wheelchair user needs at least 40 inches of clear floor space to make a turn near the island, and some accessibility guidance pushes that closer to 60 inches for a full turning radius, well above the standard 42 inch aisle used for a typical one cook kitchen.
Counter height matters just as much as aisle width. A standard 36 inch counter is too tall for most wheelchair users to work at comfortably; a lowered section around 30 to 32 inches, with open knee space underneath rather than a cabinet, allows someone seated to roll up and use the surface directly. If your island includes a sink, that sink needs a shallow bowl and knee clearance below it to meet the same standard.
Seating height and depth need adjusting too. Standard bar stools at 24 to 26 inches for counter height work for most adults, but a family planning for aging in place or a member with mobility limitations should consider a lower seating section at standard table height, around 28 to 30 inches, with a chair rather than a stool.
None of this requires overbuilding the whole kitchen to hospital specifications. It usually means designing one section of the island, often a shorter run, to the more generous clearance and height standards, while the rest of the island stays at standard dimensions. That approach keeps the kitchen functional for the whole household without turning the entire island into a compromise on every side.
Design Perspective: Function Beats a Big Island Every Time
The obsession with “the biggest island that fits” gets kitchens into trouble more than any single dimension mistake. Reachability and open aisles matter more than square footage. In a genuinely large kitchen, two smaller islands almost always outperform one oversized slab, because nobody has to reach across four feet of stone to grab a spoon. The details that decide whether a family actually loves their island, where people naturally stand, how two cooks pass each other, whether a chair blocks the fridge, usually matter more than whether the island is 6 feet or 6 feet 6 inches long.
— MediaBeast
How Tampakitchenandbath Turns These Numbers Into a Real Kitchen
Getting the clearance math right on paper is one thing. Coordinating the plumber, electrician, and cabinet maker so those numbers survive contact with an actual construction site is another. Tampakitchenandbath handles design and construction under one roof, so the island dimensions you settle on during planning are the same ones that show up when the cabinets arrive, not a compromise forced by a change order three weeks in.

Every project gets up-front pricing with an itemized breakdown, dedicated project oversight throughout, and a dust-minimizing approach that keeps disruption contained while your kitchen comes together. That combination is what turns a sizing checklist into a working kitchen without the usual mid-project surprises. If you’re ready to see what an island of your size actually costs to build, review current kitchen remodel costs and island options and request a layout review to get your specific dimensions priced out.
Where These Island Sizing Numbers Come From
- Clearance and seating standards: NKBA kitchen planning guidelines
- Practical footprint and 10% rule: The Spruce’s island planning guide
Sources
- National Kitchen and Bath Association (NKBA)
- NKBA kitchen planning guidelines (PDF)
- NKBA design & construction guidance (2023)
- The Spruce — Kitchen island planning guide
FAQ
Is a 4×8 Island Too Big?
An 8 foot island isn’t automatically too big, but it commonly runs into reachability problems since anything past roughly 5 feet in width creates a dead zone in the middle that neither side can reach, according to Fine Homebuilding. It works best in kitchens large enough to keep 42 to 48 inch aisles on every side, per NKBA guidelines; otherwise, two smaller islands usually serve a large kitchen better than one 8 foot slab.
Is There a Size Limit for a Kitchen Island?
There’s no fixed maximum, but practical limits kick in around 4 feet of width, since that’s roughly the point where the center of the countertop becomes hard to reach from either side. Length is limited more by your room’s clearance requirements than by the island itself. Once the required 42 or 48 inch aisles are subtracted from your floor plan, whatever space remains sets your real ceiling.
Is a 10-Foot Island Too Big?
A 10 foot island can work well in a large kitchen, provided the room still has room left over for 42 to 48 inch aisles on every side per NKBA standards. The bigger risk at that length is reachability across the width, not the length itself, so keeping the island to a standard 3 to 4 foot depth matters more than shaving inches off the 10 foot run.
Is a 24-Inch Island Too Small?
A 24 inch deep island sits right at the practical minimum for something to function as an island rather than a narrow table, according to DG Floors. It can hold a cutting board or a small prep station, but it won’t comfortably fit seating, storage, or a cooktop, so it works best as supplemental counter space in a tight kitchen rather than a primary workstation.
How Much Clearance Does a Kitchen Island Need on Each Side?
Plan for at least 42 inches of clearance on every side for a single cook kitchen, and 48 inches if two people cook at once or the aisle doubles as a main walkway, per NKBA guidance. Thirty six inches is the absolute minimum, and only in kitchens too tight for anything more generous.